.
{Did you know it's now super easy to pin images from ReMarkable Home?! Just hover over any image on the site and you will see the Pinterest icon show up in the top right hand corner. Just click and PIN ....even if you are on the homepage. The correct link will be pinned}
Showing posts with label cookies. Show all posts

4.15.2013

COOKIE OF THE WEEK: No-Bake Blueberry Cheesecake Cookies {Recipe}

Come visit ReMarkable Home every Monday for the cookie of the week!

I love no-bake cookies.  They remind me of my childhood.  My oldest sister used to make them for us.  I love peanut butter, and oats, and crunchy nuts.  I love their fudge-like consistency.  Awhile back I saw a pin for blueberry no-bake cookies.  But when I went to the recipe it was made with healthy ingredients and she said that the cookies were very crumbly and had to be refrigerated.  That didn’t sound too good to me.  So, I read a bunch of other no-bake cookies recipes and came up with this recipe.  I thought these were good and my family seemed to really like them.  I think next time I would add some chopped almonds for some crunch and maybe even a couple spoonfuls of blueberry jam. 

This is a great recipe for people who have a peanut allergy in the family.  It doesn’t call for peanut butter.  It is flavored with pudding mix.  You could use any flavor of pudding mix you want and change up the add-ins.  Banana and walnut would be yummy.  Or chocolate and dried cherries.  I thought blueberry cheesecake sounded good so that is what I went for.  If you’re not using cheesecake flavored pudding then there’s really no reason to add the cream cheese.  Just omit it.

Give them a try and let me know what you think!

4.08.2013

COOKIE OF THE WEEK: Coconut Spritz Butter Cookies

I posted a recipe for Spritz cookies long ago on this blog.  They are delicious and super cute.  I love them because you can color them to match your theme.  I made them for my son’s Milk and Cookies First Birthday Party in orange and blue.  I’ve made them for another party in bright spring colors.  Recently, I decided to make some to match a display table I was putting together for a church event.  But I thought it would be fun to change up the flavor and make them coconut spritz.  They turned out super delicious, so I thought I would share the recipe.

Cookie of the Week- Coconut Spritz Butter Cookies @ ReMarkable Home

Spritz are a butter cookie made with a cookie press.  You can pop them out by the dozens in a very short amount of time.  If you don’t have a press, I recommend getting one.  I got mine at Michael’s using a 40% off coupon a few years ago.  If you don’t want to buy one, you can still make these.  Just roll the dough in small balls.  They are very tasty.

4.01.2013

Milk & Cookies First Birthday Party

My kids are on Spring Break this week so I want to spend time with them and have decided to re-post some of my posts from a couple years ago this week in order to have more time for my kids.  I hope you will find some things you haven't seen here before!

Today is Cookie of the Week day, but instead of a recipe I thought it would be fun to re-post a Cookies and Milk Birthday Party I threw for my youngest son's first birthday.  I hope you like it!

Milk & Cookies First Birthday Party

Last year while perusing the web I came across the CUTEST idea for a party over at A. Party Style.  Anne had thrown a Milk and Cookies Party for her daughter.  I immediately fell in love with the idea.  If you read my post about the Versatile Blog Award you would know that I LOVE LOVE LOVE cookies!  So, I decided my baby boy needed a Milk and Cookies Party for his first birthday!  I decided to make it a PJ party since it was going to be after dinner on a weeknight and we would have a lot of school aged kids there.
For colors I went with turquoise blue, dark brown, tan, and dark orange.
 
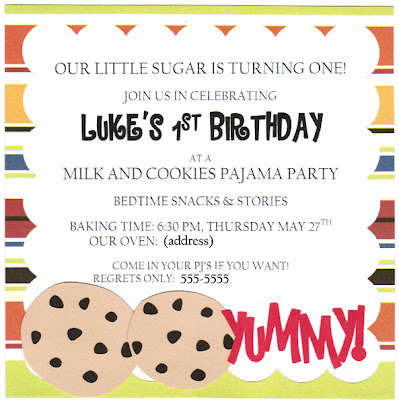
Here is the invitation I made.  I printed the text on white cardstock and used my Silhouette to cut the other parts of the invite.
 
 
Milk & Cookies First Birthday Party {ReMarkableHome.net}

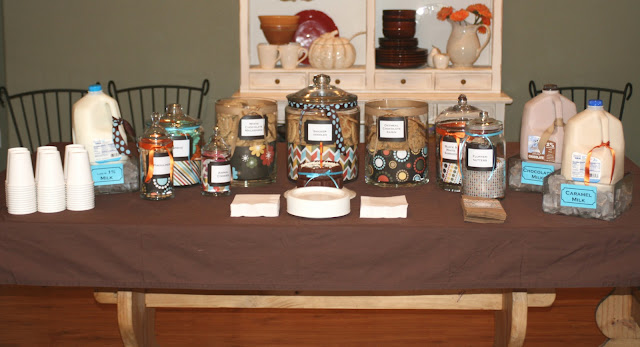
I was on a pretty tight budget but its amazing the effect some ribbon and cute paper can have!
I had some of the jars already and rounded the rest up from my family.
Milk & Cookies First Birthday Party {ReMarkableHome.net}
{more after the break}

3.25.2013

Cookie of the Week: EASY Carrot Cake Sandwich Cookies with Orange Sugar and Cream Cheese Frosting

{ReMarkableHome.net} Cookie of the Week every Monday

The other day I had to make a treat for Cub Scout pack meeting.  I didn’t want to go to the store to get ingredients, so I went to the pantry to figure out what I could make from the ingredients I had on hand that would be easy and yummy.  I saw a carrot cake mix and thought, “Carrot Cake cookies would be festive!”  I grabbed the cake mix and after referring to a cook book on how to make cake mix cookies I whipped these up.  I happened to have some leftover orange sugar in the fridge from when I made the Orange Poppyseed Snickerdoodles. I thought that carrot cake cookies rolled in orange sugar sounded even yummier.  Then I remembered some green cream cheese frosting I had in the pantry from Christmas time that we got for FREE from the grocery store!  I decided to sandwich the frosting between two cookies to make them extra fun.  I really didn’t expect them to be all that great as I’m not a huge fan of cake mix cookies but actually they were delicious!  They seemed to be a big hit with the Cub Scouts as well.  So, I thought I would share them for the Cookie of the Week. {recipe after the break}

3.18.2013

Cookie of the Week: Vintage Cherry Winks {Recipe}

Cookie of the Week- Vintage Cherry Winks {ReMarkableHome.net}

I tried a new recipe this week called Cherry Winks.  It is a recipe that my best friend’s grandmother used to make.  We were discussing ideas for new cookies I could try and she remembered her grandmother used to make these tasty little cookies called Cherry Winks.  I thought they sounded fun and yummy and decided to give the recipe a try. 

These are definitely a vintage cookie recipe.  Apparently, they were a prize winner at some point years ago.  {more after the break}

3.11.2013

Cookie of the Week: Orange Poppyseed Snickerdoodles

I had a different recipe in mind to make this week but knew it wasn’t one my oldest son would enjoy.  My husband and two youngest are heading to visit him this week and I wanted to send him some of my home baked love, so I opted for this creation instead.  I have the perfect snickerdoodle recipe, but I wanted to see if I could altar the flavors of a snickerdoodle.  I am a big fan of citrus flavored baked goods so I thought up these Orange Poppyseed Snickerdoodles and I have to tell you they are AMAZING!  I hope my son likes them!

Cookie of the Week- Orange Poppyseed Snickerdoodles {ReMarkableHome.net}


The texture of these is delectable.  Do you like that word?  Delectable I tell you!  They are light and crispy on the outside with the crunch of the orange sugar, and soft and chewy inside.  In my opinion, that is the perfect texture for a drop cookie!…. {recipe after the break}

3.04.2013

Cookie of the Week: Bananas Foster Whoopie Pies with Rich Caramel Filling

I. Adore. Cookies.  I love them.  ALL of them.  I cannot ever remember eating a cookie I didn’t like.  Well, I guess I’ve had cookies that weren’t baked correctly or just weren’t a great recipe (like a chocolate chip cookie recipe), but as far as different types and flavors of cookies I love them all.  I have oodles of cookie recipes in my recipe book cupboard.  Entire cookbooks devoted to cookies, recipes from magazines, recipes I’ve printed off the internet, recipes from friends.  I have tons of them.  And I want to try them all!  But, the problem I have is that when I make cookies, I EAT cookies.  And I can’t stop eating them.  Until they’re all gone.  It’s a problem that I really need to learn to overcome. 

So, in order to practice my self control I’ve decided I am going to make one new cookie recipe each week and post it here on my blog each Monday!  I will have no more than two of each cookie!  Girl Scout’s Honor!  If the recipe makes a large batch, then my friends will be having a lot of treats left on their doorsteps!  This is my plan and I am sticking to it.

One delicious Cookie Recipe featured Every Monday @ ReMarkableHome.net

And now for my first cookie recipe!

Bananas Foster Whoopie Pies with Rich Caramel Filling

Ok, So I guess they’re not technically cookies, but I had a bunch of overripe bananas and I had bought a Whoopie pie pan so I just really wanted to make something with those.  I had also picked up a bag of caramel bits (the ones you can use to make caramel apples without unwrapping caramel candies) and wanted to see how they would work stirred into a batter.  So, I came up with these:

Cookie of the Week- Bananas Foster Whoopie Pies with Rich Caramel Filling {ReMarkableHome.net}
(recipe below the break)

12.04.2012

Easiest Christmas Cookies EVER! {Recipe}

If you like this, PIN it for me, pretty please!  Thanks!

I just made the easiest Christmas cookies EVER!!

Easiest Christmas Cookies EVER! Quick Thin Mints.  no bake!

I have to take a Christmas treat to cub scout pack meeting tonight.  I REALLY didn’t feel like going through a big baking session.  So, I came up with this quick and very tasty little cookie to take!  These would be GREAT to take to a Christmas Cookie Swap Party.  You can make a lot of them very quickly and inexpensively! 

Here’s how to make them:

Step 1. Melt your chocolate chips. I have a Wilton Chocolate Melter pot. I HIGHLY recommend getting yourself one. Use a 40% or 50% off coupon at Michael’s or JoAnn and you can get one for around $10. Its very handy and makes my life so much easier whenever I need to melt chocolate for dipping. No double boiler or microwave, both of which can scorch the chocolate and ruin the whole thing. If you don’t have one, you can melt it the old fashioned way in the microwave, stirring every 15 seconds just until melted.  If your chocolate seems too thick to drizzle, add 1-2 tsps vegetable oil.

IMG_0441

Step 2.  While your chocolate is melting, lay a sheet of parchment or waxed paper on your half sheet pan.  Lay out your Ritz crackers as closely as possible, like so. Easy, right???

IMG_0436

Step 3.  Add your peppermint extract to your melted chocolate.  I used 1 cap full, which I think is about 1/2 tsp.  Stir well.

IMG_0443

Step 4.  Load your melted peppermint chocolate into a zipper freezer bag.  Use a freezer one because they are thicker and won’t rip apart at the seams.  Make it easy on yourself but putting the bag with one corner down into a glass.  Then just pour the chocolate in, using a rubber spatula to get it all!

IMG_0448

Step 5. Drizzle chocolate over all your Ritz.  You can do this systematically and beautifully in two opposite directions, or just go crazy like I did.  Use ALL the chocolate!  You want a good layer on these babies.  This would be a great step for your kids to do!  They could also lay out the crackers. 

Step 6.  Use a meat mallet (love that thing!) to pound your candy cane into a powder inside a freezer bag.  I did mine quite fine because I dislike biting into chunks of peppermint candy but if you like that then, by all means, don’t pound it so fine.

IMG_0448

Step 7.  Sprinkle peppermint over your cookies.  Another good way for kids to help!

IMG_0456

Step 8.  Chill in refrigerator until chocolate hardens.

Step 9.  Carefully break cookies apart and enjoy!

IMG_0475


Thin Mint Cookies

Ingredients:

  • Ritz crackers (I used 1.5 sleeves for 1 sheet pan)
  • Semi-sweet chocolate chips (or try with dark or milk or even white)
  • Peppermint extract
  • Candy Cane or peppermint candies, crushed

Directions:

Place about 2 cups of chocolate chips in a candy melter or melt in microwave.  Thin slightly with 1-2 tsps vegetable oil.  Add 1 cap full (about 1/2 tsp) peppermint extract.  Stir well.  Place chocolate in zipper freezer bag.  Snip corner and drizzle all over crackers until chocolate is gone.  Sprinkle with crushed candy cane or peppermint candies.  Chill until chocolate is hard.  Enjoy!

10.28.2011

THE BEST CHOCOLATE CHIP COOKIES EVER! {Recipe}

IMG_6817

OK, one more Halloween recipe for you.  I have this chocolate chip cookie recipe.  I don’t know where I got it but I think it might have come from a Mrs. Field’s cookbook.

They are actually called Chocolate Chip Treasure cookies.  The recipe does not call for sugar or eggs!  Isn’t that so weird??  You will see why though!  These cookies have a great chewy texture that I just love.

For Halloween, I use half chocolate chips, half Reese’s Pieces.  I LOVE them!  And they are a super cute treat to take to friends in October!

Chocolate Chip Treasure Cookies

  • 1 1/2 c. crushed graham cracker crumbs (Crush your own with a food processor or rolling pin or use the re-crushed ones.  I recently bought an enormous bag of them at Smart and Final)
  • 1/2 c. flour
  • 2 tsp. baking powder
  • 1 can sweetened condensed milk
  • 1/2 c. softened butter
  • 1 1/3 c. shredded coconut
  • 2 c. chocolate chips
  • 1 c. chopped walnuts (optional but soooo delicious!)
  • 1 tsp. vanilla

Heat oven to 375.  Beat sweetened condensed milk and butter until smooth.  Add vanilla.  Mix in graham crumbs, flour, and baking powder.  Add coconut, choc chips (or Reese’s Pieces) and nuts.  Drop onto lightly greased baking sheet, or use parchment paper.  Bake 9-10 minutes and cool on pan for 2-3 minutes before removing to a wire rack to cool.

Did you know that ovens take MUCH longer to preheat than they say?  Mine beeps to say it is preheated after about 10 minutes and it is no where close to the right temperature.  Pick yourself up an oven thermometer and use it to make sure you are at the right temperature when baking and you will have much greater success!

IMG_6811

IMG_6816

10.26.2011

PUFFY SUGAR COOKIES {Recipe}

IMG_6848

I came across a sugar cookie recipe the other day over at Somewhat Simple.  I decided I had to try it out.  Luckily, I needed to make some cookies for a Breast Cancer Awareness night I was helping to organize for the ladies at our church. 

The recipe said to chill, and then roll out and cut into shapes.  But I wanted round cookies.  So, I did not chill them, but simply used my cookie scoop to scoop balls and then rolled them smooth. 

IMG_6822

They were really yummy.  VERY similar to the Lofthouse sugar cookies you can buy at the grocery store that are like $5 for 8 or 10 cookies.  But these were yummier and moister.

Here is the recipe which you can also find HERE at Somewhat Simple. 

OLD-FASHIONED SUGAR COOKIES

  • 1 c. butter
  • 1 1/2 c. sugar
  • 2 eggs
  • 4 1/2 c. flour
  • 1 tsp. soda
  • 2 tsp. baking powder
  • 1 tsp. salt
  • 1/2 tsp. nutmeg
  • 1 c. sour cream
  • 1 1/2 tsp. vanilla

Cream butter with sugar until fluffy. Add eggs, one at a time. Add sifted dry ingredients alternating with sour cream, mixing after each addition, until smooth.  Blend in vanilla.  Chill until firm enough to roll.  Cut with cookie cutter – place on ungreased sheet. Sprinkle with sugar (if not frosting them). Bake @ 375° for 10-12 min.

This recipe made 3 1/2 dozen cookies that were as big around as a cupcake.

I did make a few changes:

  • I used Daisy Light sour cream.  It is the only light sour cream I will buy.  It’s the only regular sour cream I will buy.  There are only like 3 ingredients and they are all natural.  Other sour creams are full of a bunch of weird stuff!  yuck!
  • I added an extra 1/2 tsp. vanilla.
  • And I would reduce the salt by half next time.
  • I also did not add the nutmeg but I think that would be a yummy flavor.  It would not, however, taste like a Lofthouse sugar cookie.
  • I baked mine on a parchment lined baking sheet.  I experimented and found out you can use the parchment for one batch, then flip it over and use the other side for another batch!
  • Mine took about 10 minutes exactly to bake.  You do not want them browned.

IMG_6826

I frosted them with a cream cheese butter cream which I tinted pink.

I guess I should give you a basic cream cheese buttercream recipe, huh?

Cream Cheese Buttercream

  • 2 cubes butter
  • 1 block (8oz.) cream cheese
  • 2-3 pounds powdered sugar
  • 1 Tbsp of liquid (milk, cream, OJ concentrate, lemon juice)
  • 1 tsp vanilla

Directions:  Cream together your room temp butter and cream cheese.  Add your liquid and vanilla.  Start adding powdered sugar a cup at a time until you reach the desired consistency. 

For spreadable frosting, it can be very loose and soft.  But if you want to pipe things it needs to be stiffer.  If you use a knife to pull some frosting up to a point about an inch high and it holds its shape after a few minutes, then it is thick enough to pipe and hold its shape. 

Frosting is SO easy to make, yet can be messy.  Keep the mixer on low when combining powdered sugar or you and your kitchen will be wearing it!  Turn it off completely when you put it in, then just turn it on low.

Things frosted with this can sit out for several hours, but I like to refrigerate over night.

I frosted these like roses, which is SUPER easy to do!  Get a pastry bag and a Wilton 1M star tip.  Hold the bag basically straight up and down and start in the center.  Just start piping a swirl from the center out.  So easy!

IMG_6846

IMG_6842

IMG_6837

10.15.2011

TROLL EYEBALLS {Recipe}

IMG_3987

These tasty little morsels add a nice amount of gruesome to your Halloween meal.  They are simply Oreo truffles, dipped in melted almond bark.  I “forked” mine to make them even spookier.  Metal forks would look even better.

After dipping them I used some red food coloring on a paint brush to make the veins.  I will say it didn’t stick well or dry so next time I would make a little powdered sugar glaze with red food coloring and use that instead.  Or, you could use one of those food writer pens.

The iris is a smashed skittle, stuck on with some melted white chocolate (or use some vanilla frosting in a pastry bag) and then there is dark chocolate frosting piped into the center For the pupil.

Easy, huh???

Oreo Truffles

(yield: about 50 balls)

Ingredients:

  • 16 oz. package of Oreos, finely crushed (use food processor if you have one)
  • 8 oz. cream cheese, at room temp
  • 16 oz. almond bark or white chocolate, melted

Directions:

Mix cream cheese with finely crushed Oreos.  Roll into eyeball sized balls and place on parchment lined baking sheet.  Place in freezer for 30 minutes.  Remove from freezer and stick a fork in each ball.  Immediately dip in melted white chocolate, shaking off excess.  Place back on baking sheet and allow to harden, which should be almost instant due to cold temp of balls. 

Once cooled and hardened, decorate to look like eyeballs.

IMG_3984

I used a bucket of wheat to stand mine up in.  Rice would work as well.

ENJOY!

9.09.2011

OREO CUPCAKES {Recipe}

My oldest son turned 17 last week.  Seventeen!!! I am feeling old!  I cannot believe it.  I was 17 when I had him!  He is a senior in high school and is actually going to a special school this year where he takes college classes and gets dual credit for HS and college!  So, he is seeming very grown up and I am having a mid-life crisis, lol!

Anyway, my brilliant mother had the idea to throw him a surprise party for his b-day.  So, we did!  It was great!  He had no idea!  We had a BBQ and pool party.  I didn’t really know how many kids to expect.  We just put the word out there and invited a bunch of his FB friends and told them to invite his other friends.

So, I decided I better make a bunch of cupcakes for dessert!  I made 6 dozen Oreo Cupcakes the morning of the party.  Amazingly, it only took me about 3 hours, including cleaning up!

IMG_6527

Now that’s a lot of cupcakes!

They were very yummy.  Here is what I did:

Cupcakes:

Mix up a white cake mix (I used Duncan Hines) according to package directions, except add 1/2 c. Daisy sour cream (Daisy is the best because it doesn’t have any funky ingredients).

Once it is mixed, add 2 cups Oreo cookie pieces.  I bought mine at Smart and Final.  They come already broken up.  Or you can just break up some Oreos in a zipper bag with a rolling pin.  Stir to combine. 

Use a paring knife to separate the two sides of an Oreo, leaving the crème on one side.  Place the Oreo side with the crème with the crème side up in a cupcake liner in your cupcake pan.  Add your batter on top of the Oreo to 2/3 full.  Bake according to cake mix directions.  The key to good cakes and cupcakes is to not over bake so that they aren’t dry.  Cakes are done when they barely spring back when touched lightly with your finger.  It doesn’t have to spring back completely, just half way.

Remove from oven and allow to cool completely before frosting.

Here is the frosting recipe I made.  It is HUGE, for about 80 cupcakes, so divide it if you aren’t making cupcakes for an army.

  • 1 pound butter, room temp soft
  • 8 oz. cream cheese, room temp soft
  • 2 regular jars marshmallow crème (You could make it without this.  I’m not sure it really added anything but it sounded like a good ideaSmile)
  • 2 tsps. vanilla
  • 2 Tbsps. cream
  • 4 pounds powdered sugar
  • 2 cups superfine Oreo crumbs without the crème.  They need to be small enough to go through a sieve if you are going to pipe your frosting with a star tip.  They can be a little bigger if you are using a round tip and as big as you want if you are putting the frosting on with a knife.  You can use a food processor to make them small, or just a rolling pin and zipper bag.  Just put them through the sieve to make sure they are small enough.

With the paddle attachment of a stand mixer, cream together the butter, cream cheese, and marshmallow crème.  Add the powdered sugar.  Add the cream a little at a time to get to the desired consistency.  If you add too much it will be too thin to pipe and have it hold its shape.  You can test in in the bowl.  Just pull some up into a peak with a knife or the back of a spoon and if it holds its shape pretty well it is thick enough. Add in the Oreo crumbs and mix to combine.

To pipe these ones, I just used my coupler in a pastry bag.  You could also use a large round tip, like 1/2” diameter.  Just hold the bag vertical in the center of the cupcake and start to squeeze.  Move it in small circles to spread it out a bit as you pipe.  You will see.  It is easy.

Garnish with an Oreo, half an Oreo, or mini Oreo.

IMG_6534

IMG_6531

5.25.2011

OREO TRUFFLES on a STICK {Recipe}

IMG_5315

These are very simple to make and VERY yummy.

Grind up your Oreos with your food processor. If you don’t have one you can place them in a Ziplock bag and crush them with a rolling pin.IMG_5296

Put your crumbs in a bowl and add a block of softened cream cheese.  Use a mixer to combine. (NOTE: I tried combining the crumbs and cream cheese with the food processor.  It worked but then it made everything too warm and I had to chill it before I could roll it into balls.)IMG_5301

Shape dough into 1” balls and place on a parchment lined baking sheet.  (I used my cookie scoop to scoop out some dough and then used my fingers to divide that in half to get the perfect sized balls.)IMG_5303

Chill your dough balls in the freezer while you melt your chocolate.

I used Ghiradelli candy making chocolate I had picked up at Sam’s club at Christmas time.  You can use chocolate chips, but may end up with some white spots on the chocolate after it hardens.  No biggie if you are just making them for your family but if you want them to be really pretty I would suggest using candy chocolate.IMG_5306

Give your chocolate a rough chop.IMG_5307

Melt your chocolate.  I have this VERY handy chocolate dipping pot.  If you don’t have one melt according to package directions in the microwave.  I do not recommend using a double boiler or a bowl over boiling water.  I have had too much chocolate ruined by one drop of water getting into the bowl. 

IMG_5310

Remove balls from the freezer and insert lollipop sticks.  Working quickly, dip truffles in the chocolate coating, tap them on the side of the bowl to remove excess, and place back onto parchment.  If using sprinkles, add them before the chocolate hardens.  If they slip off too much dip a couple more before adding sprinkles to the first on so the chocolate sets a bit more and then your sprinkles will stay put.

IMG_5314

Allow to harden.  If using chocolate chips you will need to place them in the refrigerator to get them stiff again.  I placed mine in the baking cups after they were hardened just for decorative purposes.

IMG_5325

Recipe: Oreo Truffles

Yield: about 40

Ingredients:

  • 1 16oz package Oreos
  • 1 8oz block cream cheese, softened
  • 16oz. chocolate, melted

Directions:  Crush Oreos into fine crumbs and mix with cream cheese.  Roll into 1” balls and place on parchment lined baking sheet.  Chill while you melt the chocolate for dipping.  Dip the balls into melted chocolate, shake to remove excess, and place back on parchment lined baking sheet.  Add sprinkles, if desired.

5.23.2011

LITTLE MAN BABY SHOWER {Party}

Decorative items for this shower can be purchased HERE.

Well, the shower went off without a hitch.  I will admit it was a TON of work for me….much more than I anticipated.  I was exhausted by the time the party started!  But I think all the guests had a nice time and enjoyed themselves and hopefully my sister was happy and felt loved. 

So, I am just going to post a ton of pictures from the shower.  I had some trouble taking some of the pictures due to the time of day and lighting in the room.  Hopefully you will still be able to see all the little details.  In the coming days I will post recipes for the food.  Enjoy!

IMG_5335edited

IMG_5346

IMG_5353

How to make this printable HERE

IMG_5357

IMG_5368

IMG_5388

IMG_5358

IMG_5379

I wanted to do something a little different with the cupcake toppers than I have seen before.  So instead of just scalloped circles I did scalloped squares and pinked circles, each in 3 different colors.  I love how they turned out! HERE is my tutorial on making cupcake topper graphics.

Cupcakes made by my sister Melinda.  We use an icing coupler to pipe the frosting because we could never find a big enough tip.  The coupler is the little white thing that makes it so you can switch out the tips on your pastry bag.  You have to find one without a little notch in it though.

IMG_5393IMG_5394

IMG_5400

Garland inspired by THIS party.

The onesies were made with heat transfer vinyl I cut on my Silhouette.

IMG_5523

These hanging garlands spun around slowly all night.  Here you are seeing the back side of several of the circles.  I connected the shapes using clear fishing line and clear tape.

IMG_5528

IMG_5530

This was a fall colored wreath that I had spray painted white.  I added the ribbon and fabric rosettes to match my color scheme.  The twinkle lights gave a nice effect during the shower.

IMG_5478

IMG_5370IMG_5373

Vinyl mustaches on plastic cups.

IMG_5262

Stamped paper plates…how to HERE.

IMG_5435

Black Bean and Corn Salsa (Made by my sister Molly)

IMG_5441

IMG_5504

Homemade Chips (made by my sister Molly)

IMG_5471

Italian BOWTIE Pasta Salad (Made by my sister Laura)

IMG_5446

Cucumber Water (SUPER refreshing!)

IMG_5325IMG_5329

Oreo Truffles

IMG_5361IMG_5365

Pretzel “Cigars”

IMG_5427

IMG_5428

Bowtie Sugar Cookies (made with a homemade cookie cutter)

IMG_5475

Triple Dipped Strawberries (made by my sister Maggi)

IMG_5422

Baby Caleb all dressed up + the favors.

IMG_5339IMG_5341

IMG_5344

Chocolate mustache molds can be found at Bake It Pretty

IMG_5513IMG_5516IMG_5519IMG_5520

Four of my cuties in disguise!

To purchase some of the decorative items from this shower, please look here

Related Posts Plugin for WordPress, Blogger...
 
Blogging tips