.
{Did you know it's now super easy to pin images from ReMarkable Home?! Just hover over any image on the site and you will see the Pinterest icon show up in the top right hand corner. Just click and PIN ....even if you are on the homepage. The correct link will be pinned}
Showing posts with label baking. Show all posts

4.15.2013

COOKIE OF THE WEEK: No-Bake Blueberry Cheesecake Cookies {Recipe}

Come visit ReMarkable Home every Monday for the cookie of the week!

I love no-bake cookies.  They remind me of my childhood.  My oldest sister used to make them for us.  I love peanut butter, and oats, and crunchy nuts.  I love their fudge-like consistency.  Awhile back I saw a pin for blueberry no-bake cookies.  But when I went to the recipe it was made with healthy ingredients and she said that the cookies were very crumbly and had to be refrigerated.  That didn’t sound too good to me.  So, I read a bunch of other no-bake cookies recipes and came up with this recipe.  I thought these were good and my family seemed to really like them.  I think next time I would add some chopped almonds for some crunch and maybe even a couple spoonfuls of blueberry jam. 

This is a great recipe for people who have a peanut allergy in the family.  It doesn’t call for peanut butter.  It is flavored with pudding mix.  You could use any flavor of pudding mix you want and change up the add-ins.  Banana and walnut would be yummy.  Or chocolate and dried cherries.  I thought blueberry cheesecake sounded good so that is what I went for.  If you’re not using cheesecake flavored pudding then there’s really no reason to add the cream cheese.  Just omit it.

Give them a try and let me know what you think!

4.08.2013

COOKIE OF THE WEEK: Coconut Spritz Butter Cookies

I posted a recipe for Spritz cookies long ago on this blog.  They are delicious and super cute.  I love them because you can color them to match your theme.  I made them for my son’s Milk and Cookies First Birthday Party in orange and blue.  I’ve made them for another party in bright spring colors.  Recently, I decided to make some to match a display table I was putting together for a church event.  But I thought it would be fun to change up the flavor and make them coconut spritz.  They turned out super delicious, so I thought I would share the recipe.

Cookie of the Week- Coconut Spritz Butter Cookies @ ReMarkable Home

Spritz are a butter cookie made with a cookie press.  You can pop them out by the dozens in a very short amount of time.  If you don’t have a press, I recommend getting one.  I got mine at Michael’s using a 40% off coupon a few years ago.  If you don’t want to buy one, you can still make these.  Just roll the dough in small balls.  They are very tasty.

4.01.2013

Milk & Cookies First Birthday Party

My kids are on Spring Break this week so I want to spend time with them and have decided to re-post some of my posts from a couple years ago this week in order to have more time for my kids.  I hope you will find some things you haven't seen here before!

Today is Cookie of the Week day, but instead of a recipe I thought it would be fun to re-post a Cookies and Milk Birthday Party I threw for my youngest son's first birthday.  I hope you like it!

Milk & Cookies First Birthday Party

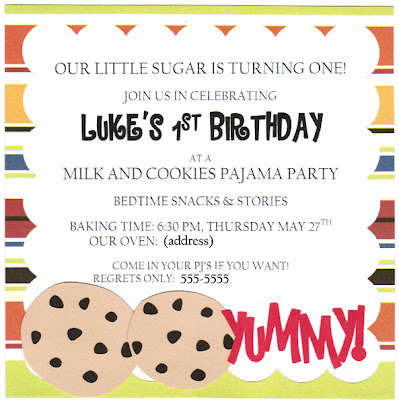
Last year while perusing the web I came across the CUTEST idea for a party over at A. Party Style.  Anne had thrown a Milk and Cookies Party for her daughter.  I immediately fell in love with the idea.  If you read my post about the Versatile Blog Award you would know that I LOVE LOVE LOVE cookies!  So, I decided my baby boy needed a Milk and Cookies Party for his first birthday!  I decided to make it a PJ party since it was going to be after dinner on a weeknight and we would have a lot of school aged kids there.
For colors I went with turquoise blue, dark brown, tan, and dark orange.
 
Here is the invitation I made.  I printed the text on white cardstock and used my Silhouette to cut the other parts of the invite.
 
 
Milk & Cookies First Birthday Party {ReMarkableHome.net}

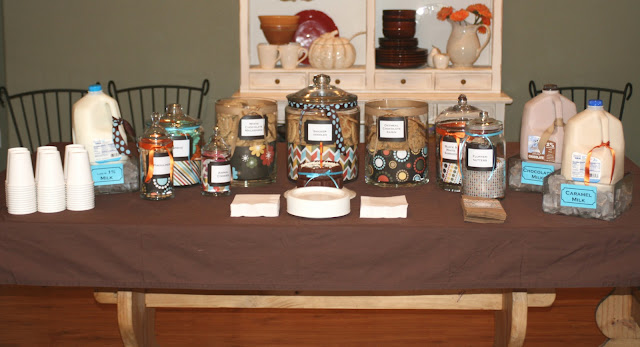
I was on a pretty tight budget but its amazing the effect some ribbon and cute paper can have!
I had some of the jars already and rounded the rest up from my family.
Milk & Cookies First Birthday Party {ReMarkableHome.net}
{more after the break}

3.25.2013

Cookie of the Week: EASY Carrot Cake Sandwich Cookies with Orange Sugar and Cream Cheese Frosting

{ReMarkableHome.net} Cookie of the Week every Monday

The other day I had to make a treat for Cub Scout pack meeting.  I didn’t want to go to the store to get ingredients, so I went to the pantry to figure out what I could make from the ingredients I had on hand that would be easy and yummy.  I saw a carrot cake mix and thought, “Carrot Cake cookies would be festive!”  I grabbed the cake mix and after referring to a cook book on how to make cake mix cookies I whipped these up.  I happened to have some leftover orange sugar in the fridge from when I made the Orange Poppyseed Snickerdoodles. I thought that carrot cake cookies rolled in orange sugar sounded even yummier.  Then I remembered some green cream cheese frosting I had in the pantry from Christmas time that we got for FREE from the grocery store!  I decided to sandwich the frosting between two cookies to make them extra fun.  I really didn’t expect them to be all that great as I’m not a huge fan of cake mix cookies but actually they were delicious!  They seemed to be a big hit with the Cub Scouts as well.  So, I thought I would share them for the Cookie of the Week. {recipe after the break}

3.20.2013

Belgian SUGAR Waffles with Biscoff Cookie Spread {Recipe}

Buttermilk Belgian SUGAR Waffles with Biscoff Cookie Spread {ReMarkableHome. net}
 
Waffles are kindof the new thing here in Utah.  There are waffle restaurants and food trucks popping up all over the place.  My husband and I recently tried out a truck called Waffle Love.  They serve up hot Liege waffles, topped with spreads, fruit, and cream.  A Liege waffle is different than your typical waffle made from batter.  They are actually made from a yeasty ball of dough containing Belgian pearl sugar, which is like sugar beads.  {recipe after the break}

3.18.2013

Cookie of the Week: Vintage Cherry Winks {Recipe}

Cookie of the Week- Vintage Cherry Winks {ReMarkableHome.net}

I tried a new recipe this week called Cherry Winks.  It is a recipe that my best friend’s grandmother used to make.  We were discussing ideas for new cookies I could try and she remembered her grandmother used to make these tasty little cookies called Cherry Winks.  I thought they sounded fun and yummy and decided to give the recipe a try. 

These are definitely a vintage cookie recipe.  Apparently, they were a prize winner at some point years ago.  {more after the break}

3.11.2013

Cookie of the Week: Orange Poppyseed Snickerdoodles

I had a different recipe in mind to make this week but knew it wasn’t one my oldest son would enjoy.  My husband and two youngest are heading to visit him this week and I wanted to send him some of my home baked love, so I opted for this creation instead.  I have the perfect snickerdoodle recipe, but I wanted to see if I could altar the flavors of a snickerdoodle.  I am a big fan of citrus flavored baked goods so I thought up these Orange Poppyseed Snickerdoodles and I have to tell you they are AMAZING!  I hope my son likes them!

Cookie of the Week- Orange Poppyseed Snickerdoodles {ReMarkableHome.net}


The texture of these is delectable.  Do you like that word?  Delectable I tell you!  They are light and crispy on the outside with the crunch of the orange sugar, and soft and chewy inside.  In my opinion, that is the perfect texture for a drop cookie!…. {recipe after the break}

3.04.2013

Cookie of the Week: Bananas Foster Whoopie Pies with Rich Caramel Filling

I. Adore. Cookies.  I love them.  ALL of them.  I cannot ever remember eating a cookie I didn’t like.  Well, I guess I’ve had cookies that weren’t baked correctly or just weren’t a great recipe (like a chocolate chip cookie recipe), but as far as different types and flavors of cookies I love them all.  I have oodles of cookie recipes in my recipe book cupboard.  Entire cookbooks devoted to cookies, recipes from magazines, recipes I’ve printed off the internet, recipes from friends.  I have tons of them.  And I want to try them all!  But, the problem I have is that when I make cookies, I EAT cookies.  And I can’t stop eating them.  Until they’re all gone.  It’s a problem that I really need to learn to overcome. 

So, in order to practice my self control I’ve decided I am going to make one new cookie recipe each week and post it here on my blog each Monday!  I will have no more than two of each cookie!  Girl Scout’s Honor!  If the recipe makes a large batch, then my friends will be having a lot of treats left on their doorsteps!  This is my plan and I am sticking to it.

One delicious Cookie Recipe featured Every Monday @ ReMarkableHome.net

And now for my first cookie recipe!

Bananas Foster Whoopie Pies with Rich Caramel Filling

Ok, So I guess they’re not technically cookies, but I had a bunch of overripe bananas and I had bought a Whoopie pie pan so I just really wanted to make something with those.  I had also picked up a bag of caramel bits (the ones you can use to make caramel apples without unwrapping caramel candies) and wanted to see how they would work stirred into a batter.  So, I came up with these:

Cookie of the Week- Bananas Foster Whoopie Pies with Rich Caramel Filling {ReMarkableHome.net}
(recipe below the break)

2.23.2013

Moist Chocolate Fudge Cake with THIN MINT Frosting {Recipe @ www.ReMarkableHome.net}

Thin Mint Bundt Cake

Last night I went to a ladies’ church function where we share recipes and bring the food to be sampled.  Our theme for the night was chocolate, so I knew I needed to make something with chocolate.  I thought it would be a good idea to kill two birds with one stone and make a St. Patrick’s Day dessert.  I have a fantastic chocolate fudge Bundt cake recipe, so I decided to change it up a bit to make it minty and green.  The result was this Thin Mint Chocolate Fudge Cake......

12.13.2012

CRANBERRY CHOCOLATE BAKLAVA {Recipe}

If you like this, please consider Pinning it for me! Thanks!!

I LOVE baklava.  It is so delicious.  Seriously.  Except when it has too many cloves, like most store bought baklava does. I don’t care for cloves.

A couple years ago I was flipping through one of those annoying advertiser “magazines” that automatically come to your house. I always look for good coupons before tossing them.  I was lucky enough to come across this recipe for Cranberry Chocolate Baklava, which I’ve tweaked slightly.  Traditional baklava is made with pistachios, I believe, as well as dates.  This recipe is the same process but tastes totally different. I love it! I made some yesterday for a party I was hosting. 

Easy Cranberry Chocolate Baklava Recipe!

Now, baklava is made with phyllo (filo) dough.  Many people are intimidated by phyllo dough. I am telling you right now, DON’T be! It is really not hard to work with at all! And those flaky layers can’t be duplicated in any other way.  I put this together in about 30 minutes, not including baking time.  So, give this recipe a try.  The cranberries and walnuts are totally Christmas-y.  You will love it!

Phyllo dough is not hard to work with but there are 3 important things to remember.

1. Make sure it is fully defrosted.  It says you can defrost it right on the counter. Read the box for directions. I left mine in the fridge for 24 hours, then set it on the counter when I started preparing the other ingredients. It was perfect.

2. Keep it covered!  The dough is paper thin, so as you might imagine it dries out really fast and will crumble to dust.  All you have to do it lay it out on your counter and cover it with a damp kitchen cloth (a clean one, obviously).  I usually use a flour sack towel folded in half.  Get it wet then ring it out and lay it over your dough. Every time you remove a sheet, you pull the towel back, grab the sheet and place it in your pan, then replace the towel.

3. Have a good pastry brush for brushing it with butter and start with the edges! You start your brushing with the edges because they are more exposed to the air and dry out the most quickly.

So, those are my tips. Now, just follow the recipe. Let me know how you like it!

Chocolate Cranberry Baklava

Ingredients:

  • 1 16oz. package phyllo dough, thawed
  • 1 1/4 cups butter, melted
  • 1 lb. walnuts, finely chopped
  • 1 cup dried cranberries
  • 1 3/4 cups semi-sweet chocolate chips, roughly chopped
  • 3/4 c sugar
  • 1 1/2 tsp. ground cinnamon
  • zest of one lemon
  • good quality cooking spray (optional)

Syrup:

  • 3/4 cup orange juice
  • 1/2 c sugar
  • 1/2 c honey
  • 1/2 c water
  • 2 Tbsp. fresh lemon juice

Directions:

Using a food processor, finely chop your walnuts. This can be done by hand if needed. Place chopped walnuts in a bowl and add sugar, cranberries, chocolate chips, cinnamon, and lemon zest. Stir to combine.

Get a half sheet pan (Approx. 15”x10”x1”) and brush it with melted butter.  Place one sheet of phyllo dough in the bottom of the pan and quickly brush with butter. (The box of phyllo I just bought was different than the phyllo I’ve bought in the past.  This one had two packages and the sheets were half as big as normal.  Normally, one sheet would cover the whole pan.  With this stuff you use two sheets, so you have a seam in the center of the pan, which is fine.  You can overlap them slightly. I think they did this to make working with the phyllo a little easier and lessen the chance of tearing.

Now, layer 5 more sheets of phyllo dough (6 total), brushing each one with butter as you go.  You don’t have to COMPLETELY cover the phyllo with butter. There will be little parts that don’t get covered, like if you’re painting with a dry paintbrush.  That’s ok.  Now, to make your life easier, you can spray every other one with cooking spray (like Pam) rather than buttering each one.  It works just great and makes things go a little faster.

After you get six sheets down, spread 1/3 of your nut mixture over that layer.  Now, add 4 more sheets of phyllo, buttering or spraying each one.  Then add another 1/3 of your filling to that layer.  Next, four more sheets of phyllo.  Add the rest of your filling mixture, then layer on the rest of your phyllo.  You should get 6 more full sheets.  You can kinda press down each layer before you put on the filling, just to help it fit in the pan better.  Once it’s all layered together, you need to use a sharp knife to cut your baklava into diamonds.  You do this by cutting squares and then cut the squares in half diagonally.  I did 6 squares the long way, and 4 the short.  You can do them smaller if you prefer.  This is probably the hardest part, especially if you are short on sharp knives.  Just go slow and kind hold the phyllo down with your fingers to keep it from moving around.  Its ok if you don’t get that bottom layer cut well.  You will cut again after it is baked.  But this keeps the top from crumbling all up, which it would if you waited to cut it until after baking. Also, trim any excess dough from the edges so it is not hanging over the pan.  After it is cut, drizzle any remaining butter over the top.

This is cooked, but I wanted to show you how to cut the squares.

IMG_0509

Bake in a preheated 325 degree oven for 50-60 minutes or until the top is a nice golden brown.

Meanwhile, clean up your dishes. Then make the syrup.  Add all the ingredients to a saucepan, bring to a boil, stirring frequently. Reduce heat and simmer for 20-30 minutes. It will become slightly thicker.  When baklava is done, remove from oven and pour syrup over the pan, making sure you get it on each piece.  I use a ladle.  This is the glue that holds it all together, so use it all!  I sprinkled mine with sugar, looking for another texture. If I had had raw sugar I might have used that!  Once its cool you can cut it all the way through and serve! Enjoy!

IMG_0543

11.03.2012

DELICIOUSLY EASY PUMPKIN MUFFINS {Recipe}

Pumpkin Muffins! Guess what the secret ingredient is!

The other day after returning home from our 8 day trip back east, I looked at the calendar and realized I was supposed to bring snacks for my son’s preschool class.  That day was a field trip to a pumpkin farm.  The theme for the week was pumpkins, so I decided I could whip together some of those easy pumpkin muffins that just use canned pumpkin and a cake mix.  I’ve made them before and while they aren’t my favorite I figured they were good enough for a preschool class.

Well, I went into my pantry and saw a carrot cake mix and decided that would be a lot yummier.  As I got started mixing the cake mix and pumpkin together, I decided to doctor up the recipe a bit to give it more flavor and make it yummier.

The result was super moist and really delicious pumpkin muffins!  I will definitely be making these again soon so I wanted to share the recipe with you all.  They are so easy and yummy!  Enjoy!

Recipe: Deliciously Easy Pumpkin Muffins

From the Kitchen of: Emily Nelson

Yield: 12 muffins or about 36 mini muffins

Ingredients:

  • One carrot cake mix (just the dry ingredients)
  • One 15 oz. can pumpkin (not pumpkin pie filling)
  • 1 tsp. pumpkin pie spice (or ½ tsp. cinnamon, ¼ tsp. nutmeg, ¼ tsp. ginger, pinch of cloves)
  • 1/3 c. milk
  • ½ c. unsweetened applesauce
  • ½ c. dried cranberries
  • ½ c chocolate chips (I prefer dark chocolate chips for this recipe)

Directions: Preheat oven to 350. Mix first five ingredients together with hand mixer. Stir in cranberries or chocolate chips. Bake in greased or lined muffin tins until the tops spring back when gently pressed with finger, about 18 minutes for mini muffins, 23-25 for regular muffins. No need for butter!!

8.29.2012

GOOEY CHEX MIX {Recipe}

If you like this recipe, please PIN it for me! Thanks!

I LOVE this stuff! I made it for our SPOOKY HALLOWEEN DINNER last year.  It is seriously one of my favorite treats and impossible to stop eating.  It makes a HUGE amount.  You need a giant bowl to mix it in, or you will have to divide it between two bowls.

halloween chex mix

Below is the basic recipe.  You can add whatever you’d like to make it festive for Halloween or any other holiday.  For Halloween, I added green food coloring to the syrup mixture, and then stirred in candy corns and pumpkins and Reese’s Pieces.

Don’t leave out the almond extract.  I think that is what makes it sooooo yummy!

Gooey Chex Mix

INGREDIENTS:

  • 9 cups Rice Chex
  • 9 cups Corn Chex
  • One box Golden Grahams cereal (generic is great!)
  • 1 cup shredded coconut
  • 1/2 cup sliced or slivered or chopped almonds
  • 2 cups light corn syrup
  • 2 cups sugar
  • 1.5 cups butter
  • 1 tsp. pure vanilla extract
  • 1 tsp. pure almond extract

DIRECTIONS:

  1. Mix first 5 ingredients in a VERY large bowl that has been sprayed well with cooking spray.
  2. In a heavy bottomed saucepan, bring corn syrup, sugar, and butter to a boil.
  3. Boil for 4 minutes, stirring constantly.
  4. Remove from heat and wait until boiling subsides, then stir in vanilla and almond extract.  Add food coloring now, if desired.
  5. Pour over cereal mixture.
  6. Stir until cereal is evenly coated.
  7. Add in any other ingredients that would melt if added earlier, such as candies or mini marshmallows. Stir.
  8. Spread mixture onto cookie sheets sprayed with cooking spray or wax paper and allow to cool.
  9. Break into pieces and store in covered container.


Flickr Tags: ,,

4.17.2012

PERFECT APPLE PIE {Recipe}

I never quite finished posting my pie recipes.  Here is the apple pie recipe I use.  I love this apple pie.  I do NOT like hard apples in my pie.  I slice mine very thin (like 1/8” or less) and cook it long enough for them to get very soft.  In my opinion, the softer and more jam-like, the better. 

apple pie

Doesn’t it look scrumptious?  Serve it with good vanilla ice cream for the perfect all-American treat!

Classic Apple Pie (based on a recipe by Mrs. Fields)

Yield: 1 pie

Ingredients:

  • 2 pie crusts, unbaked
  • 6-10 large apples, peeled and thinly sliced.  You need enough to fill your pie dish HIGH! I love to use golden delicious apples.
  • 1 c. white sugar
  • 1 tsp. ground cinnamon
  • 1/4 c. cornstarch
  • 1/4 c. salted butter, chilled and cut into small pieces
  • milk and sugar for crust

Directions: Preheat oven to 400. Place bottom crust in 9” pie plate. Mix sugar, cornstarch, and cinnamon in medium bowl. Add apples and toss gently to coat all the apples. Place apples into pie plate and dot with butter pieces. Add top crust. Press crusts together at edge to seal. Trim and flute the edges. Brush top crust with milk, half and half, cream, or a beaten egg. Sprinkle with white sugar. Cut steam slits. ( I actually vent my pie with a fork and THEN I do the milk and sugar.  I think this sort of seals the holes and helps the apples steam inside and makes them softer, which I love)

Place on center rack in oven. Bake for 20 minutes, then reduce heat to 350 and bake another 30 minutes or until filling bubbles in center and crust is nicely browned. Check periodically during bake to make sure crust edge isn’t getting too dark. If it is, cover edge with tin foil and continue baking. When done, remove from oven and cool on wire rack. Serve warm with vanilla ice cream, if desired.


Here is my crust recipe:

Basic Pie Crust

Yield: 2 crusts

Ingredients:

  • 3 c. flour
  • 1/2 c. butter flavored shortening (Crisco), cold!
  • 1/2 c. butter, cold!
  • 3/4 tsp. salt
  • 1 Tbsp. sugar
  • 9-11 tsps. ice water, drizzled one tsp. at a time

Directions: Combine flour, sugar, and salt in bowl. Cut in shortening and butter to make a coarse meal. Sprinkle a tablespoon of the water over the flour mixture. Stir with a fork. Keep adding a tablespoon at a time and stirring in between. Add just enough of the water to form a soft dough. Handle it as little as possible. Divide the dough into 2 balls. Flatten slightly and wrap in plastic. Chill in fridge for 30 minutes. Roll out the crusts on a lightly floured surface to about ¼” thickness and a diameter 2 “ larger than pie plate on each side.

I would love it if you “pinned” this.  Thanks!

4.12.2012

Sugar Apron Cakes

I was contacted by a lady named Cheryl who told me she had made a cake for a shower that was inspired by my Little Man baby shower that I threw last year.  She sent me a picture as well as a picture of an awesome Harry Potter cake she had made.  She is located in Heber, Utah.  If you live there and are in need of a great cake I would recommend checking out her site, Sugar Apron Cakes!

40021_146991625324596_113668088656950_344888_6206847_n-1

image

2.24.2012

Pie Making 101

pie baking 101

In searching for some of my pie recipes on my computer, I came across this little outline of instructions for basic pie making.  I couple years ago I had the idea to teach a homemaking class to young girls.  It was called “Domestic Divas”.  It was fun!  I had about 8 girls between the ages of 9 and 14.  I would spend about 2 hours every other week teaching them a homemaking skill.  One of the classes we did was on pie making.  You should have seen my kitchen after we were done!  But I have since heard of some of those girls making pies for their families for Thanksgiving!  That makes me so happy!

I thought I would just copy and paste what I gave out to the girls.  Hope it is helpful to some of you who don’t really know how to make pie.

Pie Making 101

  • Supplies:
  • Rolling pin
  • Measuring cups (liquid and solid)
  • Measuring spoons
  • Mixing bowls

Pastry cutter or 2 knives

  • Fork
  • Pie plates
  • Pastry brush
  • Pastry wheel for pretty lattice or pizza cutter or sharp knife

Types of Pies:

  • Fruit pie (apple, peach, berry, pear, rhubarb, etc.)
  • Custard pies (pumpkin, pecan, cream, lemon meringue)
  • Pudding pies (made with pudding and not baked)
  • Savory pies (chicken pot pie)

Types of Crusts:

  • Pie pastry (roll out)
  • Cookie crusts (press in)
  • Crumb crusts (on top)
  • Lattice pastry

Pie Pastry:

Ingredients:

Flour, salt, sugar (optional), fat (shortening or butter or both), ice water, sometimes egg or vinegar

When making pie pastry it is essential to use cold ingredients. The flakiness comes from the layers of fat and flour. If your fat gets too warm it will all blend together with the flour and you won’t have little pieces that get smashed down with flour in between. Without these layers your crust will be more tough and less flaky. Shortening is the fat that works best for flakiness, while butter gives the crust a yummier flavor. I like to use butter flavor Crisco. You can also use half butter, half Crisco, but in my experience this makes the crust very fragile and difficult to roll out. It tastes yummy though!

When working with pie pastry you want to handle the dough as little as possible. This keeps the cold ingredients cold and prevents over mixing of the flour and fat. You want to work as quickly as you can. Once you get the dough made, flatten it somewhat, wrap it in plastic wrap and chill it in the fridge for about 30 minutes. If you let it chill too long it will get too hard to roll out and you will need to let it warm up a bit before rolling it out. When rolling it out, be sure you don’t let it stick to the board. You will need to use flour to keep it from sticking to the board and your rolling pin. You want to roll the crust out so it is 4” wider than the pie pan. Once you get it big enough you can fold it in fourths to put it into the dish, or you can roll it up on your rolling pin and transfer it to the pan.

Fill the shell with the filling. Then place your top crust on. Using kitchen shears or a knife, cut both crusts about ¾” longer than the pan and roll them under, pressing together to seal the pie edge. Then make the edge look pretty.

Brush the crust with milk or cream and sprinkle with sugar if you want. Be sure to cut some slits to vent the pie so the steam can escape. You can also use little cookie cutters to cut out shapes before you put the crust on. You can use a fork to make holes in a decorative way. Or you can just make slits with a sharp knife. Cover the edges with foil to prevent over browning. Remove half way through baking.

Fruit pies need to bubble in the middle to be done. Fruit should be tender. Look at the crust underneath to make sure it looks like it is cooked, and no longer doughy. Cool your pie on a wire rack to help keep the crust from being soggy.

Custard pies do not usually have a top crust. Place bottom curst in pan and trim about 3/4” longer than pan. Roll extra underneath and flute the edge. Cover the edge with foil to avoid over browning. Pour in filling and bake. If you want, you can place the crust on the oven rack and then pour your filling in to avoid spilling during transport. Custard pies are done when only a small part in the center still moves when you shake it and a knife inserted a couple inches from the center comes out clean.

Pudding pies are very easy to make. Just make sure you give yourself enough time because they need to chill. You can find many recipes for them at www.kraftfoods.com. They are usually made with a cookie crust. You can make your own or buy one at the store.

2.22.2012

Pumpkin Pie

My family is always searching for the best pumpkin pie recipe.  It seems like every year someone tries out something different, in search of the perfect pumpkin pie.  For me, I hate cloves in my pumpkin pie, I like it cold, and I want whipped cream on top.

I wish I could figure out how to get that really creamy, chewy texture.  I think maybe adding extra eggs is the way to get that, but I’m not sure. 

Well, this year I tried out two new recipes.  I usually just make the recipe on the Libby’s pumpkin can, the one that calls for evaporated milk.  This year I came across a recipe in a little Eagle Brand sweetened condensed milk recipe booklet.  I changed up the spices to suit my taste.

I don’t have a picture of this pie, but it was GOOD!  I will definitely be making these now, rather than evaporated milk pies. 

Here’s the recipe for that one:

Recipe: Eagle Brand Pumpkin Pie

Yield: 1 pie

Ingredients:

  • 1 unbaked pie crust
  • 15oz. can pumpkin (2 cups)
  • 14oz. can Eagle Brand sweetened condensed milk
  • 2 eggs
  • 1 tsp. ground cinnamon
  • 1/2 tsp. ground ginger
  • 1/2 tsp freshly ground nutmeg
  • 1/2 tsp salt

Directions:

1. Preheat oven to 425. Whisk pumpkin, Eagle Brand, eggs, spices and salt in medium bowl until smooth. Pour into crust. Bake 15 minutes.

2. Reduce oven temperature to 350 and continue baking 35-40 minutes or until knife inserted near the center comes out clean or nearly clean. Allow to cool. Serve with freshly whipped cream.

The other recipe I found was from Taste of Home Magazine.  It was for a pumpkin pie made with eggnog!  If you love eggnog you will love this pie.  I liked it quite well, but what I loved most was the crumb topping.  I will be adding that to the Eagle Brand Pie from now on.  SOOOO GOOD!

eggnog pumpkin pie

Recipe: Eggnog Pumpkin Pie

Yield: 1 pie

Ingredients:

· 1 unbaked pie crust

FILLING:

  • 2 eggs
  • 1 can (15 ounces) solid-pack pumpkin
  • 1 cup eggnog
  • 1/2 cup sugar
  • 1 teaspoon ground cinnamon
  • 1/2 teaspoon salt
  • 1/2 teaspoon ground ginger
  • 1/2 teaspoon ground nutmeg
  • 1/4 teaspoon ground cloves

TOPPING:

  • 1/2 cup packed brown sugar
  • 2 tablespoons butter, softened
  • 1/2 cup chopped pecans

Directions

  • Place crust into a 9” pie plate.
  • In a large bowl, whisk the eggs, pumpkin, eggnog, sugar, cinnamon, salt, ginger, nutmeg and cloves until blended. Pour into crust.
  • In a small bowl, beat brown sugar and butter until crumbly, about 2 minutes. Stir in pecans; sprinkle over filling.
  • Bake at 375° for 50-60 minutes or until a knife inserted near the center comes out clean. Cover edges of crust with foil half-way through to prevent over browning. Cool on a wire rack. Serve with whipped cream.

Question of the day: Does anyone know an easy way to post a printable version of the recipes I share?

2.21.2012

Pie

I am the middle child of a family of seven girls, no boys.  As you can imagine (or some of you may know) raising seven kids is a lot of work!  My mom was lucky because her mom lived about 20 minutes from us when we were growing up.  My grandma, Bernadine, or Bernie for short, was a school teacher.  But when she retired, she dedicated her time to helping my mom to raise us girls.  She did not live with us, but she came to our house early each morning and stayed there till after dinner most days.  She cooked, cleaned, chauffeured, gardened, taught little ones to read and write, helped with homework, did laundry, etc.  She was an awesome and fun loving grandma and I miss her deeply.

One of my fondest memories of her was the way she taught me to bake pies each Thanksgiving morning.  She was so patient with me.  She showed me how to work the pie dough gently, touching it as little as possible to create a flaky crust.  I remember being in awe of how she could peel and apple with only one peel.  We loved eating those long curly-Q peels.  She would let us take the extra dough and roll it out to make little cinnamon rolls.  Those were one of my favorite things at Thanksgiving.  We would spread butter of the dough and lots of cinnamon sugar, then roll it up and slice it and bake the little rolls in a pie tin.  Thanksgiving morning was always a happy time in my home of cooking together and eating yummy appetizers, and just enjoying each other’s company.  I miss cooking with my grandma so much.  I just miss her.  A lot.  I wish so much she was around to see my kids and love them like she did me.  And out of all my parents’ son-in-laws I know she would have loved my husband the most.  In fact, I met him shortly after she passed away and I think she had something to do with bringing us together.

Well, I still love to make pies and every time I do I think of “Grammy” making pies right alongside me.

I made several pies for this past Thanksgiving.  I tried some new recipes and I loved them all.  I am going to share them with you.  I hope you know how to make crust by hand because it is just so much yummier and so much more fun.  I will give you my recipe for crust but if you don’t know how to do it I would suggest finding a tutorial online.  It is easy, but you may have to practice a few times to get the right amount of water added…that’s the only hard part.

Today I am going to share the recipe for this little beauty:

IMG_7491

This was probably my favorite pie this year.  It has a consistency very similar to very moist cheesecake.  It was tart and sweet and just super yummy.

I found the recipe in Better Homes and Gardens.  You can find it HERE.  It called for lemon but I went with lime because I love key lime pies so much.  It was delicious!

Lime Velvet Cream Pie

Ingredients:

  • 1 unbaked pie crust, pre baked half way using pie weights
  • 1 tsp. unflavored gelatin
  • 2 Tbsps. Cold water
  • 6 egg yolks
  • 14 oz. can sweetened condensed milk
  • ¼ c. whipping cream
  • ¼ tsp. salt
  • zest of two limes (or lemons)
  • ¾ c. lime juice (or lemon), fresh is best
  • whipped cream for topping

Directions: In a small bowl, soften gelatin in water for 5 minutes. Microwave for 10 seconds. Set aside.

In a large bowl, combine egg yolks and sweetened condensed milk. With an electric mixer beat on high speed for a couple minutes until well combined. Beat in gelatin, whipping cream and salt on law speed. Add lime juice and zest and mix to combine. Pour into prepared crust.

Bake 22-25 minutes or until center of pie looks set when gently shaken. Cool on wire rack. Cover loosely and refrigerate at least 2 hours.

Top with sweetened whipped cream before serving.


Basic Pie Crust

Yield: 2 crusts

Ingredients:

  • 3 c. flour
  • 1 c. butter flavored shortening (Crisco) OR 1/2 c. butter flavored Crisco and 1/2 c. butter
  • 3/4 tsp. salt
  • 1 Tbsp. sugar
  • 9-11 tsps. ice water, drizzled one tsp. at a time

Directions: Chill all ingredients well.  Combine flour, sugar, and salt in bowl. Cut in shortening to make a coarse meal. Sprinkle a tablespoon of the water over the flour mixture. Stir with a fork. Keep adding a tablespoon at a time and stirring in between. Add just enough of the water to form a soft dough. Handle it as little as possible. Divide the dough into 2 balls. Flatten slightly and wrap in plastic. Chill in fridge for 30 minutes. Roll out the crusts on a lightly floured surface to about ¼” thickness and a diameter 2 “ larger than pie plate on each side.


I would love to know a fast and easy way I could add a printable version of my recipes to my posts.  I use Windows Live Writer.  If anyone knows how, please let me know.  In the meantime, you can print by highlighting the recipe and then printing your selection.

10.28.2011

THE BEST CHOCOLATE CHIP COOKIES EVER! {Recipe}

IMG_6817

OK, one more Halloween recipe for you.  I have this chocolate chip cookie recipe.  I don’t know where I got it but I think it might have come from a Mrs. Field’s cookbook.

They are actually called Chocolate Chip Treasure cookies.  The recipe does not call for sugar or eggs!  Isn’t that so weird??  You will see why though!  These cookies have a great chewy texture that I just love.

For Halloween, I use half chocolate chips, half Reese’s Pieces.  I LOVE them!  And they are a super cute treat to take to friends in October!

Chocolate Chip Treasure Cookies

  • 1 1/2 c. crushed graham cracker crumbs (Crush your own with a food processor or rolling pin or use the re-crushed ones.  I recently bought an enormous bag of them at Smart and Final)
  • 1/2 c. flour
  • 2 tsp. baking powder
  • 1 can sweetened condensed milk
  • 1/2 c. softened butter
  • 1 1/3 c. shredded coconut
  • 2 c. chocolate chips
  • 1 c. chopped walnuts (optional but soooo delicious!)
  • 1 tsp. vanilla

Heat oven to 375.  Beat sweetened condensed milk and butter until smooth.  Add vanilla.  Mix in graham crumbs, flour, and baking powder.  Add coconut, choc chips (or Reese’s Pieces) and nuts.  Drop onto lightly greased baking sheet, or use parchment paper.  Bake 9-10 minutes and cool on pan for 2-3 minutes before removing to a wire rack to cool.

Did you know that ovens take MUCH longer to preheat than they say?  Mine beeps to say it is preheated after about 10 minutes and it is no where close to the right temperature.  Pick yourself up an oven thermometer and use it to make sure you are at the right temperature when baking and you will have much greater success!

IMG_6811

IMG_6816

10.26.2011

PUFFY SUGAR COOKIES {Recipe}

IMG_6848

I came across a sugar cookie recipe the other day over at Somewhat Simple.  I decided I had to try it out.  Luckily, I needed to make some cookies for a Breast Cancer Awareness night I was helping to organize for the ladies at our church. 

The recipe said to chill, and then roll out and cut into shapes.  But I wanted round cookies.  So, I did not chill them, but simply used my cookie scoop to scoop balls and then rolled them smooth. 

IMG_6822

They were really yummy.  VERY similar to the Lofthouse sugar cookies you can buy at the grocery store that are like $5 for 8 or 10 cookies.  But these were yummier and moister.

Here is the recipe which you can also find HERE at Somewhat Simple. 

OLD-FASHIONED SUGAR COOKIES

  • 1 c. butter
  • 1 1/2 c. sugar
  • 2 eggs
  • 4 1/2 c. flour
  • 1 tsp. soda
  • 2 tsp. baking powder
  • 1 tsp. salt
  • 1/2 tsp. nutmeg
  • 1 c. sour cream
  • 1 1/2 tsp. vanilla

Cream butter with sugar until fluffy. Add eggs, one at a time. Add sifted dry ingredients alternating with sour cream, mixing after each addition, until smooth.  Blend in vanilla.  Chill until firm enough to roll.  Cut with cookie cutter – place on ungreased sheet. Sprinkle with sugar (if not frosting them). Bake @ 375° for 10-12 min.

This recipe made 3 1/2 dozen cookies that were as big around as a cupcake.

I did make a few changes:

  • I used Daisy Light sour cream.  It is the only light sour cream I will buy.  It’s the only regular sour cream I will buy.  There are only like 3 ingredients and they are all natural.  Other sour creams are full of a bunch of weird stuff!  yuck!
  • I added an extra 1/2 tsp. vanilla.
  • And I would reduce the salt by half next time.
  • I also did not add the nutmeg but I think that would be a yummy flavor.  It would not, however, taste like a Lofthouse sugar cookie.
  • I baked mine on a parchment lined baking sheet.  I experimented and found out you can use the parchment for one batch, then flip it over and use the other side for another batch!
  • Mine took about 10 minutes exactly to bake.  You do not want them browned.

IMG_6826

I frosted them with a cream cheese butter cream which I tinted pink.

I guess I should give you a basic cream cheese buttercream recipe, huh?

Cream Cheese Buttercream

  • 2 cubes butter
  • 1 block (8oz.) cream cheese
  • 2-3 pounds powdered sugar
  • 1 Tbsp of liquid (milk, cream, OJ concentrate, lemon juice)
  • 1 tsp vanilla

Directions:  Cream together your room temp butter and cream cheese.  Add your liquid and vanilla.  Start adding powdered sugar a cup at a time until you reach the desired consistency. 

For spreadable frosting, it can be very loose and soft.  But if you want to pipe things it needs to be stiffer.  If you use a knife to pull some frosting up to a point about an inch high and it holds its shape after a few minutes, then it is thick enough to pipe and hold its shape. 

Frosting is SO easy to make, yet can be messy.  Keep the mixer on low when combining powdered sugar or you and your kitchen will be wearing it!  Turn it off completely when you put it in, then just turn it on low.

Things frosted with this can sit out for several hours, but I like to refrigerate over night.

I frosted these like roses, which is SUPER easy to do!  Get a pastry bag and a Wilton 1M star tip.  Hold the bag basically straight up and down and start in the center.  Just start piping a swirl from the center out.  So easy!

IMG_6846

IMG_6842

IMG_6837

10.15.2011

TROLL EYEBALLS {Recipe}

IMG_3987

These tasty little morsels add a nice amount of gruesome to your Halloween meal.  They are simply Oreo truffles, dipped in melted almond bark.  I “forked” mine to make them even spookier.  Metal forks would look even better.

After dipping them I used some red food coloring on a paint brush to make the veins.  I will say it didn’t stick well or dry so next time I would make a little powdered sugar glaze with red food coloring and use that instead.  Or, you could use one of those food writer pens.

The iris is a smashed skittle, stuck on with some melted white chocolate (or use some vanilla frosting in a pastry bag) and then there is dark chocolate frosting piped into the center For the pupil.

Easy, huh???

Oreo Truffles

(yield: about 50 balls)

Ingredients:

  • 16 oz. package of Oreos, finely crushed (use food processor if you have one)
  • 8 oz. cream cheese, at room temp
  • 16 oz. almond bark or white chocolate, melted

Directions:

Mix cream cheese with finely crushed Oreos.  Roll into eyeball sized balls and place on parchment lined baking sheet.  Place in freezer for 30 minutes.  Remove from freezer and stick a fork in each ball.  Immediately dip in melted white chocolate, shaking off excess.  Place back on baking sheet and allow to harden, which should be almost instant due to cold temp of balls. 

Once cooled and hardened, decorate to look like eyeballs.

IMG_3984

I used a bucket of wheat to stand mine up in.  Rice would work as well.

ENJOY!

Related Posts Plugin for WordPress, Blogger...
 
Blogging tips