.
{Did you know it's now super easy to pin images from ReMarkable Home?! Just hover over any image on the site and you will see the Pinterest icon show up in the top right hand corner. Just click and PIN ....even if you are on the homepage. The correct link will be pinned}
Showing posts with label Halloween. Show all posts

8.29.2012

GOOEY CHEX MIX {Recipe}

If you like this recipe, please PIN it for me! Thanks!

I LOVE this stuff! I made it for our SPOOKY HALLOWEEN DINNER last year.  It is seriously one of my favorite treats and impossible to stop eating.  It makes a HUGE amount.  You need a giant bowl to mix it in, or you will have to divide it between two bowls.

halloween chex mix

Below is the basic recipe.  You can add whatever you’d like to make it festive for Halloween or any other holiday.  For Halloween, I added green food coloring to the syrup mixture, and then stirred in candy corns and pumpkins and Reese’s Pieces.

Don’t leave out the almond extract.  I think that is what makes it sooooo yummy!

Gooey Chex Mix

INGREDIENTS:

  • 9 cups Rice Chex
  • 9 cups Corn Chex
  • One box Golden Grahams cereal (generic is great!)
  • 1 cup shredded coconut
  • 1/2 cup sliced or slivered or chopped almonds
  • 2 cups light corn syrup
  • 2 cups sugar
  • 1.5 cups butter
  • 1 tsp. pure vanilla extract
  • 1 tsp. pure almond extract

DIRECTIONS:

  1. Mix first 5 ingredients in a VERY large bowl that has been sprayed well with cooking spray.
  2. In a heavy bottomed saucepan, bring corn syrup, sugar, and butter to a boil.
  3. Boil for 4 minutes, stirring constantly.
  4. Remove from heat and wait until boiling subsides, then stir in vanilla and almond extract.  Add food coloring now, if desired.
  5. Pour over cereal mixture.
  6. Stir until cereal is evenly coated.
  7. Add in any other ingredients that would melt if added earlier, such as candies or mini marshmallows. Stir.
  8. Spread mixture onto cookie sheets sprayed with cooking spray or wax paper and allow to cool.
  9. Break into pieces and store in covered container.


Flickr Tags: ,,

8.27.2012

HALLOWEEN DINNER {Holiday}

I’M BAAAACK!  I am FINALLY ready to start blogging a little again.  We are pretty much settled into our new house.  Doesn’t feel like home yet, but I’m sure that will come eventually.  I’m hoping to post at least once a week!  Wish me luck!


If you like this post PLEASE pin it for me! Thanks!!

spooky Halloween dinner copy

So, somehow I got myself into this crazy tradition of a themed food Halloween dinner.  Luckily, I was smart enough NOT to do it ON Halloween, but a day or two before.  My family looks forward to it every year.  I enjoy it too, but I will tell you right now it is A LOT of work.  It’s amazing how much more work it is to make food that actually looks like things.  But it is soooo much fun to see my kids faces when they see what I’ve come up with.  I do different things each year but I always set the table with my Halloween placemats, napkins, goblets, and decorations.  I put plastic bugs in the cups and on the plates.  Its fun.  I keep it simple and just use my regular Halloween décor on the table.

Here is our 2011 dinner!  I think the kids really liked the food this year. 

IMG_6954

Ribs on a carving board with a stabbed heart.  I used precooked ribs from Sam’s club.  The heart is a red pepper.  You need to put it on a cutting board so you can stab the butcher knife into the board to keep it standing up.  The idea came from Better Homes and Gardens, BHG.IMG_6952

Spider Oreo truffles.  These were a pain in the butt to make, but aren’t they cute?  The legs are chow mein noodles dipped in chocolate.IMG_6904

IMG_6905

This is my favorite chewy Chex mix.  I will post the recipe soon.  It is so yummy.  This time I made it festive for Halloween with green food coloring, candy corns, and Reese’s pieces.IMG_6909

Flayed skin foot with rotten toenails.  This is my favorite cheese ball, formed into a foot, covered with thinly sliced deli ham.  Ketchup on the stump for blood and almond slices painted with black food coloring for toenails.  I made it into a spider the year before.  HERE is the recipe.

IMG_6922

IMG_6927

A barfing Jack o’ lantern.  My famous guacamole coming out of a Jack o’ lantern’s mouth.  Looks gross, tastes great!  HERE is the recipe.IMG_6945

Bloody intestines.  I used crescent rolls sheets stuffed with chicken roll-up filling.  I will post the recipe for this soon.  It was yummy and looked even better in person.  HERE is where I got the idea, but I didn’t use this recipe.IMG_6972

IMG_6971

And finally, Blood Spiked Punch.  I can’t remember what punch I made.  I think it had raspberries.  Any red punch would do.  Choose your favorite one!IMG_6975

Happy family!  The girl is my son’s beautiful girlfriend, not my daughter.  The boys are all mine!IMG_6982


To see a post I did about our 2010 dinner click HERE. 

Do you have any fun Halloween traditions? 

Have you made any fun, themed food? 

I would love to hear your ideas.  Its about time I start planning my dinner for this year!

10.28.2011

THE BEST CHOCOLATE CHIP COOKIES EVER! {Recipe}

IMG_6817

OK, one more Halloween recipe for you.  I have this chocolate chip cookie recipe.  I don’t know where I got it but I think it might have come from a Mrs. Field’s cookbook.

They are actually called Chocolate Chip Treasure cookies.  The recipe does not call for sugar or eggs!  Isn’t that so weird??  You will see why though!  These cookies have a great chewy texture that I just love.

For Halloween, I use half chocolate chips, half Reese’s Pieces.  I LOVE them!  And they are a super cute treat to take to friends in October!

Chocolate Chip Treasure Cookies

  • 1 1/2 c. crushed graham cracker crumbs (Crush your own with a food processor or rolling pin or use the re-crushed ones.  I recently bought an enormous bag of them at Smart and Final)
  • 1/2 c. flour
  • 2 tsp. baking powder
  • 1 can sweetened condensed milk
  • 1/2 c. softened butter
  • 1 1/3 c. shredded coconut
  • 2 c. chocolate chips
  • 1 c. chopped walnuts (optional but soooo delicious!)
  • 1 tsp. vanilla

Heat oven to 375.  Beat sweetened condensed milk and butter until smooth.  Add vanilla.  Mix in graham crumbs, flour, and baking powder.  Add coconut, choc chips (or Reese’s Pieces) and nuts.  Drop onto lightly greased baking sheet, or use parchment paper.  Bake 9-10 minutes and cool on pan for 2-3 minutes before removing to a wire rack to cool.

Did you know that ovens take MUCH longer to preheat than they say?  Mine beeps to say it is preheated after about 10 minutes and it is no where close to the right temperature.  Pick yourself up an oven thermometer and use it to make sure you are at the right temperature when baking and you will have much greater success!

IMG_6811

IMG_6816

10.27.2011

TABLECLOTH DRAPES {Decorating}

I have toile drapes on my sliding glass door.  I made them from tablecloths!  I did this years ago.  My mom helped me put some little pinch pleats in them, and they hang from drapery pins on metal drapery rings.  I have loved them!  I think I had to hem them, but then I washed them and they shrunk so I took out the hems and they are just perfect.

Anyway, tablecloths are such an easy way to make drapes.  You don’t even need to put pinch pleats in.  You can simply hang them with clip on drapery rings.  You can buy tablecloths for all seasons and holidays and change out your drapes.

A couple years ago I found some Halloween tablecloths that I loved at HomeGoods.  I picked up some really cool clip rings at Hobby Lobby with a coupon, and suddenly I had new drapes for October!

IMG_6788

The rings weren’t super strong and the drapes would come out a lot, so I tied some string around them to hold them closed and attached these spiders to the string.  I got that cute orange ribbon and tied a bow on each ring.

IMG_6792

I love how they look.  They make me happy!  When the holiday is over, I just take them off the rod, rings still attached and put them in a box to wait for next year.  While they are up I get my other drapes washed. 

I am hoping to come across some Christmas ones sometime soon!

IMG_6789

10.19.2011

GHOSTS in the GRAVEYARD {Recipe}

IMG_3982

This is one of my favorite desserts.  It reminds me of my grandma.  I am not sure what it is she used to make, but when I tasted this with vanilla pudding mixed with Cool Whip, it reminded me of something she used to make.  We call this “Out of This World Pudding Delight” but I have come across similar recipes called Éclair Cake.  To me, it tastes nothing like éclairs though.

To decorate this I added graham cracker crumbs to the top for dirt, leaving some of the chocolate glaze underneath uncovered for the path through the graveyard.  I used some of the filling for the ghosts with mini m&m’s for eyes.  The headstones are Pepperidge Farms Milano cookies, written on with icing.  And there are some Oreo crumbs lining the path.  You can decorate this any way you want, adding candy corn pumpkins or anything else you want. 

Out of This World Pudding Delight

Ingredients:

  • 2 large boxes instant vanilla pudding (I only use Jell-O brand)
  • 4 cups cold milk
  • 12 oz. cool whip
  • enough graham crackers for two layers of the pan

glaze:

  • 1 c. sugar
  • 1/4 c. cocoa ( I like the Hershey’s Special Dark or Dutch Processed cocoa)
  • ¼ c. evaporated milk
  • ¼ c. butter
  • 1 tsp. vanilla

Directions: Lay graham crackers in bottom of pan. Cut some so that it covers the bottom. Mix up the pudding mix and milk, then add the cool whip. Pour over the graham crackers and spread evenly. Place another layer of graham crackers on top of the pudding.

Make the glaze: in a small saucepan, mix the first 3 ingredients and bring to a boil. Boil for one minute. Don’t scrape the sides of the pan, but do stir continually. Remove from heat and add butter and vanilla. Pour glaze over the top and spread evenly. Chill for half a day.


P.S.  Putting the headstones on is a little tricky.  Its easier if the graham crackers have had some time to soften up a bit.  You could also leave some little holes where you don’t put a graham cracker for the Milano's.  I used a dollop of pudding mixture to help them stand up.

10.17.2011

BUGS & CHEESE {Recipe}

IMG_4002

I wish I had more and better pictures of this dish.  Most of the kids wouldn’t eat it because it looked like bugs.  It is just a baked Macaroni and Cheese recipe.

You can use your favorite mac and cheese recipe.  I topped this one with buttered bread crumbs for dirt, but I think my kids disliked that especially.  I thought it was delicious!

For the pasta, I used several different shapes.  I just tried to get ones that I thought would resemble bugs.  I used some penne, some small shells, some really tiny pasta that looked like fat, flat grains of rice, some pieces of fettuccine broken into shorter pieces, and I think some corkscrews.  I boiled each type separately and added food coloring to the cooking water to change the color of the pasta.  Once I had all the pasta cooked in different colored water, I proceeded to make my mac and cheese.

Here is the recipe I used:

Macaroni and Cheese

Ingredients:

  • 1 pound pasta (I like medium shells)
  • 3 c. whole milk
  • 1 c. cream
  • ½ c. butter
  • ½ c. flour
  • 3 cups shredded Swiss cheese (preferably Gruyere or Jarlsberg) (about 10 ozs)
  • 3 cups shredded sharp or extra sharp cheddar cheese (about 10 ozs)
  • 1 cup shredded cheddar for topping
  • ½ tsp freshly cracked black pepper
  • ¼ tsp dry mustard
  • ¼ tsp freshly grated nutmeg
  • 1 tsp. course Kosher salt

Directions: Preheat oven to 375.

Put a pot of water on to boil. While you are waiting make a roux by melting the butter in a heavy bottomed saucepan, then add the flour. Stir well and cook on medium for about 3 minutes. Whisk in the milk and cream. Continue to cook and stir over medium heat until the sauce thickens. Cook pasta in salted water according to box directions. While it is cooking, grate your cheese and add it to the white sauce (butter, flour, milk). Stir till cheese is melted. Add salt, pepper, nutmeg and mustard. Drain pasta and return it to the pot. Pour cheese sauce over pasta and stir well to combine. Pour into a 9x13 baking dish. Top with shredded cheddar cheese. (Add buttered bread crumbs if desired) Bake at 375 for about 30 minutes or until cheese is melted and browned. If it is taking too long to brown the cheese put it under the broiler for a few minutes, watching carefully so it doesn’t burn.

10.15.2011

TROLL EYEBALLS {Recipe}

IMG_3987

These tasty little morsels add a nice amount of gruesome to your Halloween meal.  They are simply Oreo truffles, dipped in melted almond bark.  I “forked” mine to make them even spookier.  Metal forks would look even better.

After dipping them I used some red food coloring on a paint brush to make the veins.  I will say it didn’t stick well or dry so next time I would make a little powdered sugar glaze with red food coloring and use that instead.  Or, you could use one of those food writer pens.

The iris is a smashed skittle, stuck on with some melted white chocolate (or use some vanilla frosting in a pastry bag) and then there is dark chocolate frosting piped into the center For the pupil.

Easy, huh???

Oreo Truffles

(yield: about 50 balls)

Ingredients:

  • 16 oz. package of Oreos, finely crushed (use food processor if you have one)
  • 8 oz. cream cheese, at room temp
  • 16 oz. almond bark or white chocolate, melted

Directions:

Mix cream cheese with finely crushed Oreos.  Roll into eyeball sized balls and place on parchment lined baking sheet.  Place in freezer for 30 minutes.  Remove from freezer and stick a fork in each ball.  Immediately dip in melted white chocolate, shaking off excess.  Place back on baking sheet and allow to harden, which should be almost instant due to cold temp of balls. 

Once cooled and hardened, decorate to look like eyeballs.

IMG_3984

I used a bucket of wheat to stand mine up in.  Rice would work as well.

ENJOY!

10.13.2011

SPIDER CHEESE BALL {Recipe}

IMG_3990

This is a super yummy cheese ball recipe.  I make it for Thanksgiving and Christmas as well as any other time I need a yummy appetizer.

For the web, I simply spread some cream cheese on a plate and then used pieces of red pepper to make a web.  The eyes were made with slices of cucumber and then slices of carrot, glued on with cream cheese.  The mouth is another piece of red pepper.  For the legs I took a stalk of celery and split it lengthwise.  Then I cut it about half way through in the middle and then carefully bent it, being careful not to let the stringy fibers break. 

IMG_3980

Ranch Cheese Ball

Ingredients:

  • `1/2 c. prepared double strength milk recipe ranch (This means mix together 1/4 c. milk, 1/4 c. mayo, and 1 1/2 Tbsps ranch dressing powdered mix)
  • `8 oz. finely shredded cheddar cheese (room temp) Be sure to shred your own as it has much more flavor.  I use sharp cheese or extra sharp cheese.
  • `8 oz. cream cheese (softened)
  • `3-5 oz. toasted sliced almonds, or any other nut you like, toasted and chopped.

Directions: Mix salad dressing and cream cheese with mixer. Add cheddar and mix well. Scrape down sides of bowl so mixture is all together in bottom. Cover and freeze 30 minutes. Shape into ball and roll in almonds. Wrap tightly in plastic wrap and refrigerate until firm. Serve with your favorite crackers. Note: 8 times this recipe will make 10 good-sized cheese balls for Christmas gifts. You could also shape into a log shape.

Serve with crackers.  I added in some veggies for our Halloween dinner to try to get some vegetables in.

IMG_3991

10.11.2011

CHOCOLATE COVERED WHAT???

I thought I would start with the easiest and ickiest recipe of my Halloween foods….Chocolate Covered Cockroaches!

Here in Vegas we get a lot of roaches.  I have a great phobia of them.  They really freak me out.  But I decided if they were covered in chocolate they may not be all that bad!

IMG_3992

IMG_3993

So, here they are.  They are SUPER yummy

Ingredients:

  • whole pitted dates
  • dipping chocolate (or milk chocolate chips)

Directions:  Melt the dipping chocolate according to package directions.  Dip the dates in leaving a little of the “roach” showing.  Looks best if you leave the end that the pit came out of because it more closely resembles a cockroach.  Place on parchment paper and refrigerate until firm.  Be sure to label them before serving!  Enjoy freaking out your guests!

10.09.2011

HALLOWEEN DINNER {Party}

A few years ago I started a tradition of making a Halloween dinner for my family.  I guess it got started because I came across some placemats and napkins that I thought were so cute I couldn’t pass up.  Then, of course, I had to use them. 

Since I have five sons, I have always tried to mix some trick in with the treat.  I like to make food that looks like something….themed food, I guess you would say. 

Today I am going to post pictures from the dinners that I have pictures of and then I will post some of the recipes in future posts.  I hope it gives you some ideas and inspires you to make a spooky Halloween meal for your own family this year!

P.S. We don’t necessarily do this on Halloween.  Actually, we don’t ever do this on Halloween.  Usually a couple days before Halloween.

Here you can see my placemats and the napkins are being used as placemats too.  We invited guests last year and I only have 8 placemats.  I love those goblets I have and I always put a fake bug in them for a little surprise!  This time I scattered candy corns around the table like confetti.

IMG_3998

Here we have our spider web for our spider cheese ball to sit on:

IMG_3980

A nice pan of ghost in the graveyard:

IMG_3982

Some delicious troll eyeballs.  My 8 year old made the signs for all the food!

IMG_3985

And here is our friendly cheese ball spider with veggies and crackers for dipping:

IMG_3990

IMG_3991

Caramel apples:

IMG_3972

Chocolate covered cockroaches…..mmmmm, my favorite!:

IMG_3992IMG_3993

Snake bread (pictured before baking because I forgot to take one after!):

IMG_3994

IMG_3996

The buffet table with bubbling witches brew:

IMG_4001

Bugs and cheese under dirt (mac and cheese):

IMG_4002

The table set on a year we didn’t have guests.  I just added some of my Halloween décor to the center:

IMG_0698

Well, those are all the digital pictures I have.  The possibilities for food are endless.  You can find recipes and ideas all over the web.  One I like to do is make meatloaf but shape it like the cut off foot of a monster, using nuts for toenails and putting ketchup on the stump to look like blood!  I would love to hear about other things you have made as I am always looking for new ideas!

10.07.2011

CARAMEL APPLES {Recipe}

IMG_3973
Ok, so I’ve been a really bad blogger.  I am sorry.  I guess its just not at the top of my priority list lately.  I have been super busy with just life and kids and friends and family and church and housework.  I’ve been doing a lot of things, but it takes so much more time to photograph the things that I do that I just haven’t wanted to do it.  Plus, I am not a very good photographer and I don’t have a lot of good light in my house.  I have a hard time getting any decent pictures unless it’s the perfect time of day.  It is frustrating.  But I don’t want to just let this blog go.  So, I am going to try to get 2 to 3 posts up each week.
I love Halloween.  I love the colors and the foods and PUMPKINS!  I ADORE the fall.  It is my favorite season.  I love when the weather starts to cool and we finally get some relief from the inferno that is Las Vegas summer.  I love the crisp air in the mornings.  I just live for fall!  And Halloween is a big part of that.
So, I am going to be posting some Halloween things over the next couple weeks.  I hope you like them!
Today I am going to tell you how to make the most delicious caramel apples.  I make the every year and they are always a big hit.  They really are not too difficult.  And they are so much yummier than making them from premade caramel candies. (cheaper, too). 
You MUST, and I repeat MUST, have a candy thermometer.  I have bought the glass ones at the grocery store many times and they always break.  So, if you can afford it, invest in a better thermometer.  If not, pick up one at Wal-Mart or the grocery store.
Once you have your thermometer you have to test it to ensure its accuracy.  First you need to know what temperature water boils at where you live.  So, do a little online reasearch to figure that out.  At sea leve it boils at 212 degress.  Where I live it boils at 203.  Once you know this number, put a pot of water on and bring it to a full rolling boil.  Then test the temperature.  If your thermometer doesn't read the same number that water boils at where you are, then you need to take that into account when making caramel.  So, for example, if water boils at 210 where you live and your thermometer reads 205, then your thermometer is 5 degrees too low.  So when you are making candy and you are trying to get to 240, you would really need to get your thermometer to 235.  Does that Make sense?  You need to test your thermometer every time you are going to use it to make candy.  When making candy its very important to have the correct temperature reading because the consistency of the candy depends upon how hot you heat it.  Hard candy is heated to a much higher temperature than a chewy caramel candy.  Basically, the hotter it gets the harder it gets.  SO, if you don’t want your caramel to crack your teeth when you try to bite into it, you have to make sure you don’t get it hotter than you should.  And if its not hot enough it will slide right off the apples.
IMG_0695
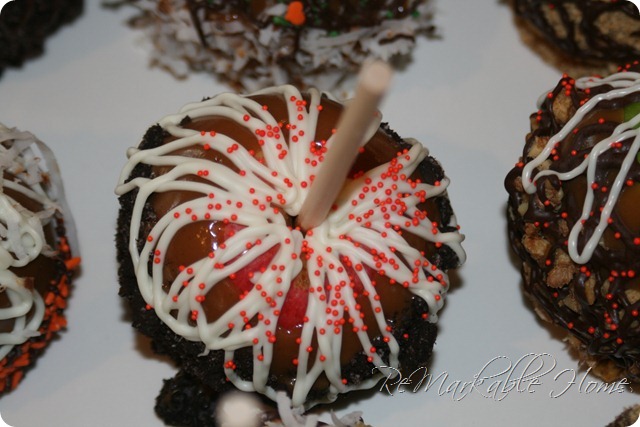
I like to dip mine in caramel and then in something else, like chopped nuts, cookie crumbs, candies, mini chocolate chips, chopped candy bars, or sprinkles.  Then I like to drizzle them with melted chocolate or white chocolate or both.  Granny Smith apples are the traditional choice, but you can use any firm non-overripe apple you like. 
IMG_3972
You can use traditional popsicle sticks, or something more creative like these wooden dowels you can buy at the craft store.  You could also use some kind of natural twig if you had that growing in your yard.  Not sure what type of wood would be ok but I’ve seen it done. 
Here is my recipe:

INGREDIENTS:
14 small tart apples (or fewer bigger ones.  I like to use small ones.)
1/2 cup butter (no substitutes)
2 cups packed dark brown sugar
1 cup dark corn syrup
1 14-oz. can sweetened, condensed milk
1 tsp pure vanilla extract
14  sticks

DIRECTIONS: Wash and dry the apples and then refrigerate at least overnight.  I like to soak them in a bowl of cold water with 1/4 cup vinegar.  This helps remove the wax.  Then i scrub them with a rough towel or vegetable brush.  Refrigerate the apples until chilled.  The apples should be cold when you dip them. Insert a wooden craft stick or a large lollipop stick into the core of each apple.
Combine butter, brown sugar, corn syrup, and condensed milk in a large heavey bottomed pot.  Be sure it is twice as big as the amount of liquid because it will bubble up ALOT.
 Cook over medium-high heat, stirring constantly until 240 degrees (firm ball stage) , taking into account any discrepancy in your thermometer.

Remove mixture from heat and add the vanilla. Dip each apple in the caramel, allowing the excess to drip back into the bowl.   You may have to use a spoon to get the tops or tilt your pan with one hand and dip with the other, depending on how wide of a pot you used.  (I use the back of my wooden spoon to kinda wipe the bottoms a little so there isn’t a big pool of caramel under each apple.  Place on a well greased sheet of aluminum foil to cool. If dipping or rolling in other ingredients, do so immediately.  Once the caramel is cooled you can drizzle with melted chocolate if desired.  To do that, melt chocolate chips in a microwavable bowl stirring every 15 seconds.  The chips will start to melt and you will see they will melt more as you stir.  Do not overheat.  Place the melted chocolate in a gallon or quart sized zipper bag and snip a bit off the corner to make a hole.  Drizzle the chocolate over the apples.
IMG_3979
IMG_3974
IMG_3977
These make a great gift wrapped in cellophane and tied with a cute ribbon.  Who doesn’t like a caramel apple?  Enjoy everybody!

Related Posts Plugin for WordPress, Blogger...
 
Blogging tips