

I picked up some little glittered styrofoam Easter Eggs at Dollar Tree a couple weeks ago. I thought the colors were pretty and figured I could use them somehow. They came in a pack of 12, I believe and each one had a little ribbon hanger, like an ornament. {more after the break}
Showing posts with label Easter. Show all posts
Showing posts with label Easter. Show all posts

3.21.2013
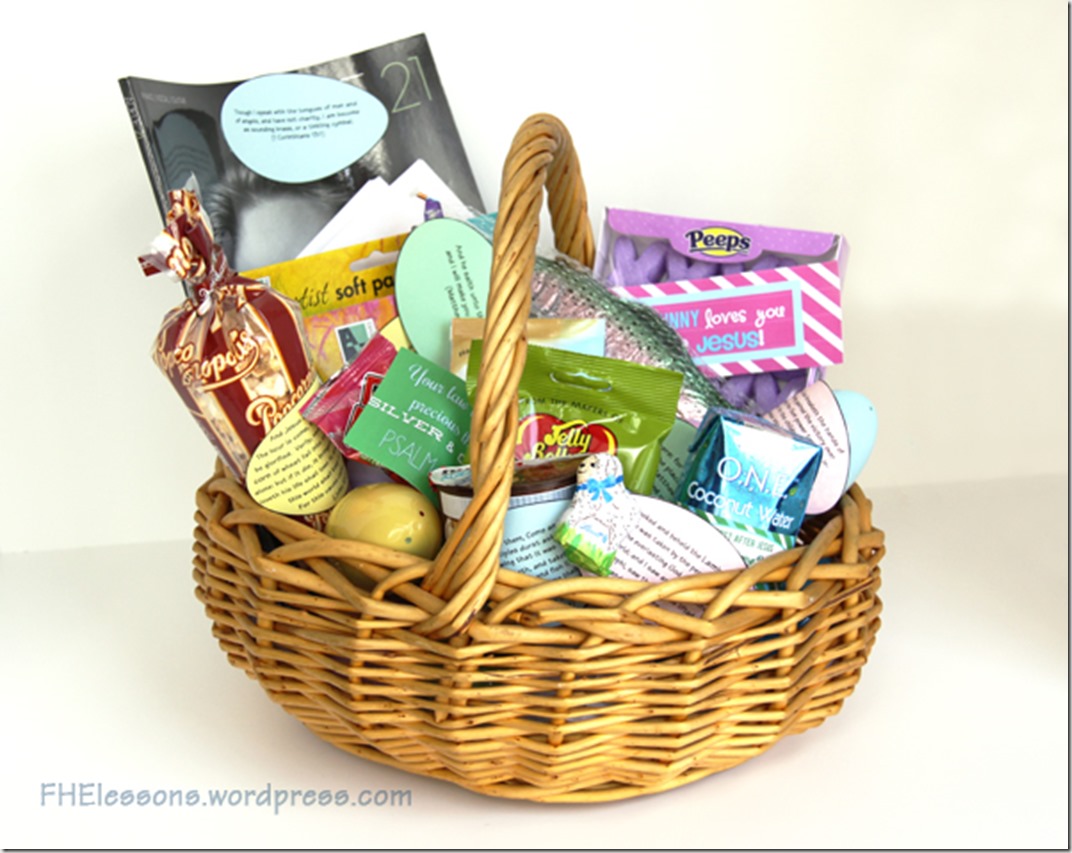
Christ Centered Easter Baskets
My amazing sister who blogs about Family Home Evening ideas over at Family Home Evening Lessons just posted this awesome Christ Centered Easter Basket today and I wanted to share it with my readers, especially due to the great response I had to me Christ Centered Easter Idea Roundup last week. She has great ideas and FREE printables to go along with them! Head on over to her blog for all the details. I am going to get started on my baskets first thing next week. Well, I’ve got some things already but need to get all the treats and eggs ready still! So much to do, so little time!!
Click the picture to be taken to the post. Enjoy!
3.19.2013
Pinteresting Tuesdays- How to use up all those Easter PEEPS!

Peeps are pretty much a must at Easter time. I mean, how can you NOT buy them? They are so cute with their little faces and sparkly sugar in pretty bright colors. I always get them for my kids’ baskets. And I think most of my kids like them and eat them…my kids pretty much eat anything made out of sugar! But I know a lot of people don’t like Peeps. So, I thought it would be fun to do a roundup of some things you can do with Peeps, either to make them yummier or to just make them into something you won’t be eating. There are some really fun ideas out there. So, go grab a few boxes and get busy transforming them. Or, steal them from your kids on Easter!
How fun would it be to get a box of these? Chicks with their bottoms dipped in chocolate and sprinkles. So pretty! 
Source: yourhomebasedmom.com via Emily on Pinterest
{more after the break}

3.12.2013
Pinteresting Tuesdays: Christ Centered Easter Ideas
Which one is your favorite??
I love Jesus. He is my Savior and my friend. Easter is about His resurrection, and his atoning sacrifice for me and for all of us. I try to find ways to keep Christ in Easter in my home. I remind my kids what Easter is really about. I remind them that eggs and chicks and bunnies are symbolic of new life, re-birth, resurrection. I remind them that lambs symbolize the Lamb of God. I try. But with the ever increasing commercialism of religious holidays it can be hard to keep the focus on the true subject of celebration. So, I have been looking for more obvious ways to keep Christ our focus at Easter-time. This round up contains the ideas I have found. I hope those of you who worship Jesus will enjoy this post!
This is a fabulous dinner where all the food is symbolic. Definitely check it out! Such great ideas and more fun than ham and funeral potatoes.
Source: fhelessons.wordpress.com via Emily on Pinterest
I love this one! Create a resurrection garden! Isn’t this awesome??
Source: wearethatfamily.com via Emily on Pinterest
A wonderful Easter color subway art with some of Christ’s names.
Source: thegirlcreative.com via Emily on Pinterest
Love this simple banner with a great message!
Source: 52mantels.com via Emily on Pinterest
We have done this as a family for years. Resurrection eggs. There are many different versions out there….
3.05.2013
Pinteresting Tuesday: 10 Easter Subway Art Printables!
I thought it would be fun to round up some Easter Subway Art for you. There are a lot of cute ones out there. I thought about making my own, but with so many great ones out there to choose from, why would I? I think I will print a couple of these off, one that is about bunnies and eggs, and one that is about the Savior of the World, whose Resurrection we are celebrating!

Take a look and let me know which is your favorite!
Chalkboard art is all the rage. This was the only Easter one I found. She has a vertical version as well. I love it! 
Source: moderationinallmama.blogspot.com via Emily on Pinterest
This one has words going all directions, which is fun! 
Source: ishouldbemoppingthefloor.com via Emily on Pinterest
I like the simplicity of this one and the colors are a little muted.

Source: everycreativeendeavor.com via Emily on Pinterest
{Seven more below the break…..}
4.15.2011
Yummy Easter Eggs by NatSprat
We are so lucky today to have the sweet and talented Natalie from NatSprat here to do a guest post! I met Natalie in Blogland quite soon after I started this blog. She has been nothing but kind and supportive! She is a total sweetheart! We actually found out we are related through marriage! My husband and Natalie have a common first cousin! It’s such a small world!
I am leaving town this afternoon and taking my 5 kids on a trip for Spring Break. I was feeling overwhelmed with needing to come up with blog posts for this week while I was trying to get ready to go so I asked Natalie if she could help me out with a guest post and she graciously agreed! She has an amazing blog called NatSprat and I hope you will run over and see her and become a follower over there if you love her as much as I do!
So, without further ado, I present to you my good friend Natalie and her super cute Easter Eggs!

Hi! I'm Natalie from over at NatSprat! I'm so thrilled to be guest posting here at ReMarkable Home! Emily is one of my favorite people in the world and I'm so happy we've met through Blogland! She requested a tutorial on something Eastery (yes, that's a word) and this is something my kids and I just made this week. We had so much fun making it! (Okay...and even more fun eating it.) It's a tutorial for really cute and really easy Easter Rice Krispies Eggs! So, put on your bunny ears and here we go! :)  YOU WILL NEED: 1 bag of marshmallows, 4 cups Rice Krispies, 1 stick of butter, food coloring (I used neon), a measuring cup (1 cup size), plastic Easter eggs (washed with soap and water and dried), no-stick spray, wood spoons, bowls, sprinkles (optional). You are going to make a basic Rice Krispy Treats recipe, but smaller.
  Melt 3/4 cups marshmallows and 1 Tbsp butter in your pot on low-medium low heat until it's smooth.
 YOU WILL NEED: 1 bag of marshmallows, 4 cups Rice Krispies, 1 stick of butter, food coloring (I used neon), a measuring cup (1 cup size), plastic Easter eggs (washed with soap and water and dried), no-stick spray, wood spoons, bowls, sprinkles (optional). You are going to make a basic Rice Krispy Treats recipe, but smaller.
  Melt 3/4 cups marshmallows and 1 Tbsp butter in your pot on low-medium low heat until it's smooth.
  pour it into a bowl...
  Add your food coloring until you reach your desired color.
  Stir in 1 cup of Rice Krispies.
  Do this process with each color you want, and put them in a greased bowl.
  Take your washed and dried plastic eggs, and give them a coating of cooking spray inside.
  Now for the fun, creative part! Layer the colored Rice Krispy mixtures however you want inside both halves of the egg.
  Squish both sides of the egg together tightly.
  Plop out the egg, and you'll end up with this!
  Make a whole bunch of them! Aren't they so fun and colorful? They are almost too cute to eat. {ALMOST} You can even go a step further and decorate them with sprinkles! (See the top picture!) Have Fun! :)
Thank you SOOO much Natalie! I am totally taking the supplies for this to the beach and doing this with my kids instead of dying eggs!
4.07.2011
Spring Spritz Cookies
Are these not adorable?

Spritz cookies are one of my favorites. They are absolutely addicting. They are super fun because you can make them in all different shapes and colors. And one recipe makes about 8 dozen, but you can put like 30 on a cookie sheet so it goes quickly! Here is how to make them:
Here are the ingredients you need...just basic stuff. If you don't have almond extract you can leave it out.

Cream your room temperature butter and your sugar together with an electric mixer until it is a light yellow color.

Then add your egg and milk.
Sift together your flour and baking powder and gradually add to your wet ingredients. (Or be naughty like me and sprinkle on your baking powder and then dump in all your flour at once). Mix until thoroughly combined, scraping down the sides and bottom of bowl a couple times.

Your dough is now complete! How easy was that?
I used 4 different colors, so I put 3/4 of the dough aside in a bowl.

I left the last 1/4 of dough in the mixer bowl and added some pink food coloring.

Doesn't it look pretty all stripey? You could make a stripey dough if you want, but I kept mixing until it was uniform in color.

To make spritz cookies you need one of these...a cookie press. You can find them at craft stores and cooking stores and I think even WalMart has them. Or order one online. They come with different discs, which is what determines the shape of your cookies. Here are the four flower discs I have. Cookie presses can be as cheap as $10 and with a 40% off coupon at Michael's you can get it for $6! This one was a middle of the road model and I think the original price was around $20. They even have more expensive ones that are battery operated (not sure why you would feel the need for that) but are apparently supposed to be easier to load.

But they are really easy to load. You just press dough down into the tube and then put the disc in place and screw on the end cap. Easy!

Then you just press them out. Each time you pull the trigger a cookie is pressed out. You need to use an ungreased baking sheet. I tried to use parchment to make clean up easier, but they dough won't stick to it. So, ungreased cookie sheet it is. Place the press right up next to the last cookie. You will get 5 cookies across the sheet. Just FYI, the first cookie is sometimes a bit hard to get going because a little of the dough needs to be hanging out of the holes in order for it to work right. If you make an ugly one just pick up the dough and shove it into your mouth set it aside to put back into the press for later.

Here they are all pressed out and ready to bake!

When you finish that color, wipe off your mixer bowl and paddle and place another hunk of dough in the bowl. I don't wash them in between cause I am too lazy. Just try to get most of it off but if a little is left it won't matter. Here are my green ones. Aren't they cute?

When they bake they puff up a bit. You know they are done when the bottoms are barely browning. Don't overcook them!

Here are the blue ones all cooked. I have loosened these from the cookie sheet, that is why they are so close together. That reminds me, don't let them sit on the cookie sheet for more than 5 minutes. Use a very slim spatula to loosen them. Don't worry...some will break and you can hurry and eat them.

Green ones all baked.

Purple beauties all ready to go!

Once they are cooled you can use some icing to brush on to them and then add sprinkles to dress them up. The icing makes them stick. I just thinned my icing till it seems thin enough to brush on with a pastry brush.

I brushed a few cookies at a time and then sprinkled them. Don't do too many or your icing might dry before you can get the sprinkles on. The icing also gives them a bit of a shiny top coat.

To make the bouquet, I melted some white chocolate chips in a chocolate melting pot. If you don't have a chocolate melting pot, just put about 1/2 cup of chips into a small glass bowl. Microwave them stirring every 15 seconds. Don't get them too hot. Once they are about half melted you should be bale to melt them completely just by stirring. Be SURE not to get any water into the bowl or the chocolate will seize up.
Here I am putting a bit of chocolate on the back of a cookie.

Then you stick a stick into the chocolate and give it a turn to coat it with the chocolate.

Place another cookie on top, matching up the shape.

Lay them down on the cookie sheet so the cookie you put on last is on the bottom, that way the white chocolate drips down onto that cookie ensuring they stick together well. Let them harden up before you move them.

I think they are soooo pretty on a white plate. They are really irresistible!


Here I put some paper easter grass in a cello bag and added some cookies. Tie closed with a cute ribbon and deliver to your sister who will love you forever for ruining her diet!

Finish your bouquet by finding a cute bowl or vase. Place a piece of styrofoam inside to stick the cookies into. Then cover the top of the styrofoam with Easter candies.

It would look cute to tie a green ribbon around each stick to resemble leaves....but my kids were DYING to eat these so I didn't do it.

Spritz cookies can be made in all different shapes, including Christmas trees and pumpkins, so they are a great cookie for every holiday!
Wilton Spritz Cookie Recipe
Ingredients:
- 3 1/2 cups all-purpose flour
- 1 teaspoon baking powder
- 1 1/2 cups butter softened
- 1 cup granulated sugar
- 1 egg
- 2 tablespoons milk
- 1 tsp vanilla extract
- 1/2 tsp. almond extract
7-8 dozen cookies.
Preheat oven to 350ºF.
In bowl, combine flour and baking powder. In large bowl, beat butter and sugar with electric mixer until light and fluffy. Add egg, milk, vanilla and almond extract; mix well. Gradually add flour mixture to butter mixture; beat until combined. Do not chill. Fill cookie press with dough and with desired disks, press cookies onto ungreased cookie sheet.
Bake 10-12 minutes or until edges are light golden brown. Cool 2 minutes on cookie sheet on cooling rack. Remove from sheet; cool completely.
Icing Recipe:
1 c. powdered sugar
2 tsps. milk
2 tsps. light corn syrup plus more for thinning
1/4 tsp clear vanilla or almond extract
Directions: Mix ingredients together in a small bowl with a spoon. Add small amounts to corn syrup to thin to reach desired consistency.
What is your favorite cookie??
Subscribe to:
Posts (Atom)


