.
{Did you know it's now super easy to pin images from ReMarkable Home?! Just hover over any image on the site and you will see the Pinterest icon show up in the top right hand corner. Just click and PIN ....even if you are on the homepage. The correct link will be pinned}

3.31.2011

Homemade Pizza...Better than Takeout!

We are big homemade pizza fans.  I make it at least twice a month, in one form or another.  I made some for dinner last night so I thought I would post about it:)

Ok, here are the things you need to make really good pizza.
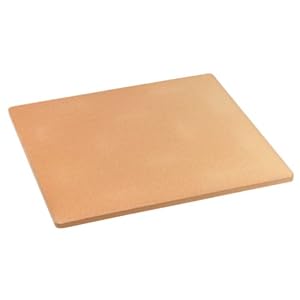
1. A pizza stone.  This is imperative.  You can buy them for pretty cheap, but those ones tend to break.  I just bought a large rectangular one for $35 on Amazon.  It is thicker than my other ones have been so I am hoping it will last.  HERE is the one I got.  It had good reviews.  Some people say you can also just get an unglazed terra cotta tile.  It would be cheap.
Old Stone Oven 4467 14-Inch by 16-Inch Baking Stone

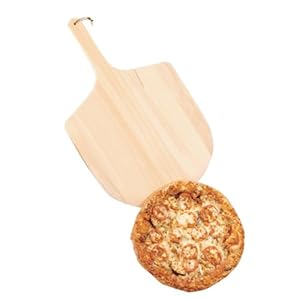
2.  A pizza peel.  This is also imperative.  This is how you put the pizza into the oven and take it out.  You need this because the stone has to be in the oven and super hot.  HERE is one you can get on Amazon.
Norpro Pizza Peel and Paddle


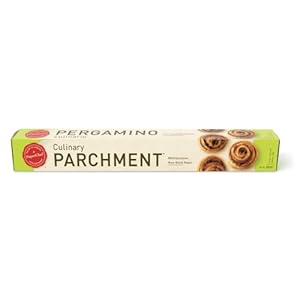
3. Parchment paper.  This is what you will use to roll the dough out onto.  Then you will use your peel to transfer the pizza and parchment to the stone.  It will keep your stone cleaner and eliminate the need for excess flour or cornmeal, which is what is normally used to keep the crust from sticking to the board.  You can buy it in rolls.  Just buy the cheapest stuff you can find.  I have also bought some large sheets that I cut in half to line my cookie sheets on....saves alot of cleanup!
PaperChef Culinary Parchment Paper, 15-Inch by 26-1/2-Inch
4.  My recipe! This is imperative if you want your pizza to be delicious...ha ha!  Just kidding.  You can use any recipe you like, but I will post mine here for you to try.


Recipe:  Homemade Pizza
From the Kitchen of:  Emily Nelson
Yield:  3-4 pizza crusts,depending on size

Ingredients:
`2 Tbsp. instant yeast
`1 Tbsp. brown sugar
`2 c. warm water –not too hot or you will kill your yeast. It should be about 100°
`1.5 tsp. salt
`3 tbsp. olive oil
`5 c. flour

Pizza Toppings: (obviously use whatever you like on your pizza)
`marinara sauce (I use my homemade sauce or Prego Roasted Garlic and Parmesan) Just use a very thin layer...don't go overboard
`shredded mozzarella (again, use less than you think...it will spread out some when it melts)
`pepperoni
`thinly sliced red onion strips
`thinly sliced baby sweet peppers (red, yellow, and orange)

Directions: 
To make crust:
In bowl of your electric mixer, combine water and yeast and sugar.  Add 1 cup of the flour.  Add salt and oil.  Add another cup of  flour.   With dough hook, allow mixer to mix this for about 5 minutes to build up the gluten.  Add the rest of the flour until the dough starts to clean the sides of the bowl.  Knead for about 8-10 minutes.  Form into 2 balls and put in plastic zipper bags sprayed inside with Pam.  Store in the fridge over night. (or use it that same day) 

To make pizza:
Preheat your oven and pizza stone for at least 1 hour at 500 degrees.  Let dough come to room temp before using.  Take about half of the dough balls, (1/4 of recipe) and roll it out on your parchment paper using a floured rolling pin.  You can also just press it out with your fingers.  Get it to desired thickness of crust, but not more than ¼” thick in center.  Brush edges with olive oil and sprinkle with seasonings such as garlic salt, if desired.  Add toppings.  Slide onto your pizza peel and transfer to pizza stone.  Bake for 15-20 minutes or until cheese is browned and bubbly. Remove from oven with pizza peel. 

3.30.2011

Overwhelmed

I am feeling a little overwhelmed by this blogging stuff.  I''m not really overwhelmed by posting, but I think I am overwhelmed by trying to promote the blog.  So, then I am wondering why I am trying to promote it?  I guess the answer is because what is the point of writing a blog unless people are reading it?  Anyway, I am wondering what is your ONE best way to promote your blog that takes the least amount of time?  I know linking up to linky parties is good, but there are soooo many and it takes too much time.  I don't want this thing to take over my life! 

Anyway, just wondering what you all think.  Do you try to promote your blog?  Do you care if no one reads it?  Do you know any way to promote your blog that doesn't take tons of time?

BTW, I would be super appreciative if you would help me out by just sharing this blog with your friends who you think might like it.  Maybe do a facebook post about it or send an email to those you think might like it.  That would be super great!

K, have a good day!

Like, not Love

Well, I did it.
I added a Facebook "like" button to my sidebar.  So, now you can declare your undying "like" for me:)  Only if you want to.  No pressure!

Top 10 Party Tips


So, here are my top 10 tips for a fun kids party for younger kids:

1.      No favor bags!  Kids don’t need them.  They don’t even notice when you don’t give them one.  Save the money!  If you HAVE to give them something to take home, make it ONE small thing or a prop they used during the party like a hat or princess wand or whatever.

2.      Make the cake special.  It doesn’t have to be professionally decorated.  There are tons of cute and simple ideas out there for making fun cakes.  Family Fun has a lot of good ones.  Or, if baking is not your thing you can buy a fun cake from somewhere like the grocery store.  You can also do cupcakes and just put something cute on the top that goes with the party.


3.      Play games, but DON’T have prizes.  I can’t stress this one enough.  Prizes only make everyone but the kid who wins feel bad.  Kids don’t need prizes to enjoy playing games.  I gave up on prizes a few years ago and have never heard a complaint.  If you HAVE to give prizes, give one to EVERY kid for EVERY game you play.  This will keep hurt feelings and tears to a minimum.

4.      Do NOT serve a meal.  Ok, if your kids are older and it is meal time you might be able to get them to eat some pizza.  But for little kids, just serve a few snack items and then cake.  You don’t even have to serve ice cream if you don’t want to.  Kids’ tummies are small.  Don’t expect them to be able to eat like adults.


5.      Decorate!  Decorations set the mood…they make the party feel like a party.  You don’t need to go to the party store and spend hundreds of dollars.  Our favorite decorations are streamers and balloons.  You will have a fun cake for a centerpiece.  And you can have a colorful tablecloth and plates and cups and napkins.  I like to buy the plates and napkins and cups in solid colors.  If the kid requests some type of character party, like Spiderman, then I MIGHT get those plates.  But I really prefer the look and feel of brightly colored dinnerware.  I coordinate them with the streamers and balloons to keep things looking cohesive.  Tissue paper pom poms are another fun and inexpensive way to liven up the place, especially for a girl’s party.  Paper banner garlands are all the rage and I love them!  I have made a couple because I have a Silhouette craft cutter.  You can buy one on Etsy for a reasonable price if you really want to up the excitement factor of your decorations.  You could get a brightly colored one that says “Happy Birthday” and then it would probably look cute with most of the parties you throw.


6.      Have an activity planned for the “waiting time” at the beginning of the party.  Puzzles are good.  Coloring is good.  Coloring on a paper tablecloth is fun.  Just something they can kind of do independently while you are welcoming other guests.

7.      Do cake at the very end.  Don’t hype the kids up on sugar until the last moment, and then send them out the door to their parents!  I even suggest opening gifts before cake.  It drives me nuts when the child is opening gifts and the kids are so super hyper that they are practically mobbing the birthday child.  Waiting to serve cake at the end seems to help.

8.      Serve Cheese Balls.  You know what I mean...those little chip balls like Cheetos that you can buy in a huge barrel at Sam’s Club.  Kids LOVE LOVE LOVE these things.  Just make sure you let them wash their hands after they eat them so your whole house doesn’t turn orange.

9.      Set the table.  This is something I have been doing the past few years since we got a huge kitchen table.  It isn’t imperative, but I think it is fun for the kids.  I like to have the table set with the plates and cups and napkins when they get there.  I will hang streamers above the table to make it feel more festive.  I will have the food set out (unless it needs to be in the fridge).  Then each kid has a seat to sit on to eat their food and they won’t be running around your house eating.


10.  Remain calm.  Things won’t always go perfect.  Expect spills on your clean floor. (If you are smart you will wait to mop until AFTER the party)  Expect someone to get hurt.  Expect the birthday child or a guest to have a meltdown at some point.  But the kids will still have a good time.  If all you did was invite them all over to play with your old toys they would still have fun.  SO, everything else you do is just icing on the Birthday cake!

3.29.2011

Simple Train Birthday Party

The internet is full of AMAZING and extravagant birthday parties for children of all ages.  I am in awe of these parties that are completely coordinated, from the color of the food to the ribbons on the favors and everything in between.  They look incredibly beautiful in pictures and laid out in a blog post. 

But, do the kids REALLY have more fun?

I would have to say no.  Now, I have 5 kids, and the oldest is 16.  I have given each of my kids a birthday party nearly every year.  So, in all, I have thrown somewhere between 30 and 35 birthday parties.  Some have been more extravagant than others.  But I really think the kids have just as much fun at a simple birthday party as they do at one that is completely decked out.

I know many of us who surf blogs see these parties and wish that we had the time, energy, money, or talent to be able to throw one like that for our kids.  But, many of us are lacking in one or more of those areas.  And guess what.  That is ok! 

I thought it would be fun to show you the last party I threw for my 4 year old.  I REALLY tried to keep it simple, because I just didn’t want to spend the time or money to make it over the top amazing.   It was a train themed party because he LOVES his GeoTrax train set.  (As a side note, the GeoTrax trains are the absolute BEST…our whole family plays with them together.  Ok, maybe not my teenagerJ)

Here is the invitation I made on my computer.  I could have just as easily used a handwritten store-bought invite, but I find it easier to print something up myself.  On this one I was trying to learn a little about making invitations on my computer.


Here is the train cake I made for him.  I know it LOOKS extravagant and over the top, but it was actually quite easy.  I wanted it to be very exciting for the kids.  I have thrown several other train parties and made the train cake where each car was a small cake all decorated with frosting and candy.  This one was MUCH easier.  I just found some little éclair trays and baked cupcakes in them.  I piped some blue frosting on each one and covered with bright candies I got at the dollar store.  I cut out the wheels on my silhouette and attached them with hot glue.  No Silhouette?  Just cut them free hand or with a craft punch.  I didn’t even go to the trouble to decorate a special engine, but used the motif from the invitation to flank a double decker cupcake.  The track was super easy.  I covered a board I had in the garage with white paper.  Then, I piped chocolate frosting for the track and used fudge dipped wafers for the railroad ties.  SUPER easy.  The dollar store has LOTS of different kinds of cookies for, well, a dollar!


For the food I picked up these plastic bins at the dollar store, cut out some wheels and attached them with brass brads, and tied the bins together with some ribbon.  I made an engine by placing one bin with another smaller bin I had on top.  I bought a white plastic tablecloth at the dollar store and used one of those super fat markers to draw tracks down the middle of it. 


We played simple games like “Car, Car, Engine” (Duck, Duck, Goose), London Bridge, “The Conductor Says” (Simon Says), and Red Light, Green Light.  The kids LOVED these games.  They also got to play with our huge GeoTrax train, which they loved.  When they first got here while we were waiting for everyone to get here they put together some of those super long alphabet and number train puzzles.

They each got an Engineer’s hat to wear and then take home.  I don’t do favor bags.  Honestly, I think most parents hate favor bags.  They are full of candy they don’t want their kids to have a little toys that get left all over the houseJ  Plus, they are super expensive to put together when you have a party with more than 4 or 5 guests.  So, I gave up on favor bags.  I figure the kids get to come to a party so why do they need to take the party home???

So, that is our simple train party.  I have to tell you the kids had a blast and several of the moms have told me things their kids said about the party days later.

Tomorrow I will be posting my top 10 tips for a great kids birthday party!

3.28.2011

Mexican Cobb Salad Recipe


Does this not look soooo yummy?

I saw a recipe for a salad like this in some magazine, so I made up my own recipe for it.  I served it at a birthday party and it was a big hit with all the moms!  It is easy and healthy.
Enjoy!

1. Cover large platter with chopped or torn romaine lettuce
2. Place in rows on top of Romaine:
               ` Avocado dipped in lemon and lime juice to prevent browning
               ` Cherry tomatoes, halved (or any tomatoes you like)
                `Grilled corn (remove husk, dip in water, grill on med heat for 7 min, turning every  min, cut off the cob)
                `Black beans (from can, rinsed and drained)
                `Grilled chicken breasts, sliced (before grilling, season chicken by sprinkling with Lawrys, fresh cracked pepper, taco seasoning, and Montreal’s chicken seasoning)
3. Sprinkle with chopped cilantro and Cotija cheese
4.Serve with Homemade ranch made according to directions on packet plus 2 tsps. taco seasoning per 2 cups of dressing.  Or, for a healthier dressing, replace half the mayo with nonfat plain yogurt.
What types of recipes do you like to see on blogs???

3.27.2011

My First Blog Award

I am so excited!  Cute Natalie over at NatSprat awarded me the Versatile Blogger Award!
I am totally flattered.  It is always nice to be recognized.  Natalie is such a sweetheart and has been really encouraging of my blog and the things I am doing.  I appreciate her.  Take a few minutes to check out her cute blog and see what she has been up to!

I guess I am now supposed to tell you 7 things about myself.  So, here goes.

1.  I am the middle child in a family of 7 girls, no boys!  Yes, I have middle child syndrome.  I am close with all my sisters.  It was really fun to grow up in a house with all the same gender, and now I am raising 5 boys, no girls, so I hope they think an all boy house is fun, too!

2. I met my husband ONLINE!  Gasp!  I know, it is weird, but it happened.  It was an online dating service for LDS people.  We sent the first email on Dec. 10th, met in person on Dec. 30th, got engaged on Valentine's day, and were married June 15th!  We have a great marriage 10 years later!

3.I am addicted to sugar, and cookies in particular.  If you set a plate of cookies in front of me I will eat the whole thing, no matter what kind they are.  Not all in one sitting, but definitely all in one day.  I am working on breaking my sugar addiction, but it is sure hard!! 

4. I am SUPER silly and dorky when in the privacy of my own home.  I do really weird and funny (well, the kids think they are funny) things just out of the blue.  Like, I will sing is a crazy voice or do some funky dance or, I don't know, just act in a way that would be TOTALLY embarrassing if caught on hidden camera.  I often wonder if other people act this way at my age, or if I am just weird  special.

5. I love nature.  I am happiest when the weather is beautiful....not too hot, not too cold, sun is shining, little breeze.  I LOVE that.  I get super grumpy when the weather is bad for more than a day.  I could never live somewhere that doesn't get ALOT of sunshine.  I love to be outside in nature...the beach....the mountains...the park....walking along the street in Las Vegas.  It doesn't matter where, as long as the weather is good.

6. I love historical fiction.  Movies, books, TV shows.  I just love to see how things might have been in those days.  I love the way they talk and act so proper.  If anyone has any book recommendations I will gladly take them.  I love to read historical fiction....but I don't think my husband loves it so much because I neglect everyone and everything while I am reading a good book.

7.  I secretly wish I had become a doctor.  I love medical stuff.  I am soooooo mad that they got rid of Discovery Health.  It was one of my favorite channels.  I think the human body is so interesting and so amazing.  I would love to know more about how it works.  I am really hoping one of my boys will want to be a doctor.  Maybe my youngest who was in the NICU for 11 days when he was born.  I am going to tell him how the doctors saved his life and pray hope that he wants to be able to help other people like that!

I will be on the lookout for some blogs to pass this fun award onto!  I will let you know who I choose soon.

3.26.2011

Surprise Giveaway!

This blog is 10 whole days old and my counter just hit 3000!  I am so thankful to those who have taken their time to comment on my blog and make me feel so special.  I am also thankful to those who have chosen to become a follower or subscribe to my email feed!

To show my appreciation I thought it would be fun to have a surprise giveaway!!!  Everyone likes a giveaway right?

So, I entered all the followers and commenters in a drawing at Random.org.  The winner will recieve a box of "Good Mail" which is a box of fun stuff from me!  In the box will be one set of my Chalkboard Bin/Basket Labels!!  There will also be some other fun surprises:)

There were 98 people entered:

Random Integer Generator

Here are your random numbers:
46 
Timestamp: 2011-03-26 21:09:56 UTC

And the winner is #46, who is one of my email subscribers who I believe is named

Sandy T!!!

Congratulations Sandy!  I will be emailing you for your address.

A HUGE thank you to all you sweet people who have made me feel so special and loved and like the things I do everyday matter and make the world a little bit better place!  I deeply appreciate you!

File Folder Paper Organizer Tutorial

I had wanted to buy one of those cute wood magazine wall racks that you see in catalogs like Ballard or PB.  But they were too expensive and didn’t have enough pockets. Plus, I had no space for one on my walls.  So, I designed this organizer out of file folders.  I don’t have pictures to show you how it was put together but here is the finished product.  I used double sided file folders so that I could fold down the edge with the tab where you label the folder.  This makes it a bit easier to slip the papers in.  I put mine together with glue and grommets.  I love the grommets and ribbon, but it was really difficult.

So later, I made one for a customer by sewing the folders together with my sewing machine and a heavy duty needle.  It worked well.  I then punched some holes and added some grommets and the ribbon because she wanted them.  If you want them too, please get yourself a seriously heavy duty hole punch or just buy 3 or 4 because you will no doubt break one or two.  You could totally make it cute without the grommets though.
I made these ones for some Christmas gifts for my sisters.

I also made some cute labels for my tabs and added some dimensional epoxy stickers that I got in the dollar bins at Michaels.  Mine has a pocket for each kid, me, my husband, coupons, receipts, things to file, and things to do (like papers I need to do something about like make an appointment or order something or deal with a problem like insurance claims).  You can have a pocket for whatever you want.  Mine is hung on the pantry door in my kitchen.  The best way to hang it is with 3M Velcro strips.  You probably need 4 of them.  Mine is on 2 but occasionally my one year old rips it off the door.


DIRECTIONS:
The file folder has a front and a back, right.  And both the front and back have an inside and an outside.  The inside is where your papers would go if you were using the folder as intended.  So here is what you do, step by step:
1.      Fold down the tab edge of each folder to the outside of the front of the file folder. 
2.      If you want it extra extra sturdy you could take the folders to be laminated with this edge folded down. You should probably glue it down if you are going to have it laminated.
3.      Decide how much space you want between the tops of the front side of each folder.  Figure out how much you want them to overlap. I made mine far enough apart so that an 8 ½” x 11”  piece of paper could be in the pocket upright without covering the label of the pocket above it.
4.      Use a glue stick to glue the inside of the back side of one folder to the outside of the back side of the folder that will be above it.  So the folders are like nesting inside each other and then spread out like a deck of cards.  Make sure you measure the distance so you can make it the same on each folder.  If you laminated (I did not) you may have to use a different type of glue.
5.      Once all the folders are glued together you can sew up the sides with your machine.  Be sure to back stitch at the ends or tie off your threads to it doesn’t unravel.
6.      Add any embellishments you want like labels, stickers, or ribbon.
7.      Hang with 3M Velcro strips.

I realize this would be a lot easier to understand with pictures.  But I think if you follow the instructions carefully you should be able to duplicate this.  Please email me if you have any questions. 

3.25.2011

Command Central

A couple years ago I was feeling overwhelmed by paper clutter in our kitchen.  I was also feeling like the kids needed a place to drop their shoes and backpacks because I was tired of them being all over the downstairs all the time.  Like I told you before, this house is tight with no wasted space.  Most homes in Las Vegas do not have mud rooms.  My laundry room is upstairs. 

Anyway, I had read some different ideas about creating a "Command Central" sort of deal.  I decided that was what I needed.  Here is what I came up with:

In this picture you see a bench that I already had.  I had originally ordered it to go at one end of my custom 4' wide table, but when it came the back was too tall and it just didn't work.  So, it got placed on this wall in my kitchen and I LOVE it there.  It gives people a place to sit and chat with me while I am cooking.  I actually lay down on it quite often to talk to my husband or when I am waiting for the baby to finish eating or something.

Underneath it there are 3 bins.  When I got them, I only had 4 kids and the oldest's room is downstairs so I figured he didn't need a bin anyway.  Now, I have 2 kids in elementary and 2 who are at home.  The two youngest share a bin and the other two have their own.  They are SUPPOSED to put their shoes and backpacks and lunchboxes in their bin.  But for some STRANGE reason their crap is still constantly all over the downstairs.  At least the bins give me a place to throw their stuff when I find it all over the place and then I can make them carry the whole thing upstairs and unload it.

Above the bench is a fabric covered magnet board.  I had my husband go to a sheet metal place and have them cut this to the size I needed.  They sell sheet metal in a couple differenct sizes at Home Depot.  I think they may have one that is 3'x4' which is close to the size this is.  When I made this I wrapped the fabric around to the back and hot glued it in place.  If I were to do it again I would first secure it to the front with spray mount.  We then figured out where the studs were in the wall and screwed the thing into them.

I made an altered clipboard for the 3 oldest kids at the time.  Now the 3 middle kids use them.  You can find tutorials for these all over the web.  You basically just modge podge paper onto a clipboard and add some cute embellishments.


I got a desk calendar and hung it up with neodymium magnet hooks I buy from http://www.emovendo.net/ .  I ordered some of their other super strong magnets and bought these little watchmakers' tins from some place online that I can't remember (sorry!).  I used E6000 to glue the magnets to the backs of the tins.  Then I found some cute papers and cut out circles to place inside the tins. 


I use the board to post things I want all my family to see.  Not so much kids artwork and papers because we have a huge magnet board upstairs for that.  But if they get an award I will post it here.  I also have my dry erase menu frame on this board. 

This has been a functional solution to some of my paper problems.  I am ready for a new fabric on it.  Wonder if I can talk my husband into helping me re-do it?  I guess I could do it all by myself if I HAVE to.


Tomorrow I will show you the organizer I made to deal with all the paper clutter!

3.24.2011

Giveaway!

I have decided to have a giveaway on this blog soon!!  Are you excited?? I am debating on what to give away.  It will be something I would normally sell.  Out of the items I have listed for sale, what would you hope the giveaway would be for?


Be sure to check back so you don't miss the giveaway!  It will be soon!

Silhouettes

I made these silhouettes of my boys last year.  It is easy to do, but I will warn you it takes some time.  Here is how I did mine:
1. Take a picture of your child from the side.  Ok, take like 20 of each kid.  Use a plain background behind them and keep them far enough away from the background that you don't get a shadow.  Then choose the picture that you think looks the most like them and shows off their features.  Try to get them to just look natural and hold their head in a neutral position.  They can smile just slightly.  For girls, put their hair up off their neck in a ponytail or some other up-do.
2. Print the pictures on cardstock.  Size them to the size that you want your silhouettes to be.  You can just print them in black and white.
3. Use some tiny and very sharp scissors to cut out your silhouettes.  The things that make them look really good are all the little hairs.  All the hairs I cut were not actually there, but I tried to make each kid's hair resemble what it does in real life.  Also, make sure you cut in an eyelash.  I could see the eyelash on the little boys but my teenager's nose bridge has gotten more defined as he is becoming a man and his eyelash does not extend past that.  I cut him in an eyelash anyway. 
4.  Use some spray mount on the back of what you just cut out to adhere it to your black paper.  I used a textured cardstock I had on hand.
5. Cut around your white cardstock to duplicate the silhouette on the black paper.  SO, yes, you cut the heads out twice.
Actually, this is when I cut all the little hairs in more detail.
On the eyelashes, I think I cut off the white paper because you could kindof see it behind the black.  For the rest of the edges you won't really notice the white once you get it mounted on your white paper.
6. Use spray mount again to adhere your black silhouettes to your white background paper.  Use any kind of paper you want, but I like a good quality artist paper.
7. I wrote their name and age on the back of their shoulders with a black felt tip pen.
8.  I bought an oval wood plaque at the craft store that I traced to make the oval around the silhouettes.
9. Frame them however you want.

Do you see some of the little hairs?  The white spots you see on his head are from the flash.
I am planning to do these for my kids at least every other year, hopefully every year.

3.23.2011

Front Door Chalkboard

Once upon a time I was reading Blue Cricket Design when I saw this amazingly cute painted frame hung on the front door!  I immediately fell in love.  So, I was telling my girlfriend about it.  She had also seen it and thought it was cute.  She came up with the idea to make a chalkboard in a frame for the front door.  We both decided to do it!  I don't know if she ever did.  But, I raided my mom's basement and found this old wook frame that was actually coming apart.  I tried several different ways of putting it back together but the wood was warped.  So, I put it back together as best I could and filled the spaces with caulk.  I spray painted the frame this green color because I figured green goes with pretty much every season.

For the chalkboard, I used a scrap of hardboard we had left over from some other project.  I cut it to the correct size with a jigsaw and painted it with chalkboard paint and a sponge brush.  Once it was dry I used a staple gun to secure it into the frame.

I added some eye screws to the back to thread my ribbon through for hanging.  I cut these blue swirly things on my Silhouette out of vinyl and applied them to the board.  This was summer time so I added this bright ribbon.  A very simple project!
This is the old color of my door.  Isn't that a cute little boy??  He is MINE!
This is the new color of my door.  The swirls got removed in October when I added some spiderweb vinyl.  After that I meant to add something Christmas-y but never got around to it. 


This is what is on it right now.  See, I didn't space the words well and instead of re-doing the whole thing and trying to be a perfectionist I just let it be.  This is all chalk marker.

I just love this sign.  I switch out the ribbons for seasons and holidays.  I write things on it about holidays, birthday, countdowns, or just how I am feeling.  I do keep it positive and refrain from writing "Today sucks!"
It is a fun way to connect with the neighbors.  I see them walk by and look at my door to see what is written that day.  It is fun!

I will be listing one or more of these for sale for thsoe who don't want to make one themself!

3.22.2011

Key Lime Pie (or tarts)

A few people have asked for my key lime recipe from the Garden Tea Party Shower.  So, here it is:


Ingredients:
`8 oz tub Cool Whip
`1/2 c lime juice ( I use the bottled key lime juice usually)
`1 can sweetened condensed milk
`zest of one lime
`green food coloring if you want it to look more green ( I didn't use it here)

Directions:  Mix all together, fill pie shell, chill.  Garnish with real whipped cream, lime slices, or meringue. 

In this picture I put the filling in a pastry bag fitted with a large star tip and piped it into these little tart shells we got in the baking aisle at the grocery store.  You could do this in a prepared graham cracker crust, puff pastry shells, an actual pastry shell.  To be honest, it is sooo yummy to dip fruit in and especially to dip shortbread cookies in!!!  Enjoy!

Linking up to Sweets for a Saturday


Meatballs and Marinara over Spaghetti


So, there SHOULD be a picture here of the completed dish on a beautiful white platter garnished with a sprig of parsley or basil.  BUT, I forgot to take a picture!!  OOPS!

I'm going to give you my meatball recipe and my marinara sauce recipe.  The meatball recipe is one I adapted from Ina Garten's recipe to make it more "mom of five kids" friendly.  Her recipe calls for ground pork, veal, and beef.  I keep ground beef on hand, but have never once bought ground veal and only bought ground pork once.  Plus, ground beef bought in bulk from Sam's club is much more within my budget!  She uses fresh grated parmesan, which I do also sometimes but today I am using Kraft Parmesan cheese which is again more budget friendly.  Ina also uses fresh parsley.  I use it if I have it on hand, but there's no way I'm making a special trip to the store for it!

So here goes:

Gather your ingredients.  I forgot to get out the milk, so pretend there is a jug of milk sitting here.  And you don't need that entire loaf of bread, just about 1/4 of it.  Also, I put in the Italian seasoning in case you don't have seasoned bread crumbs you could add some Italian seasoning to your plain bread crumbs.  I use whole nutmeg that I grate with my microplane.
Tear some chunks of bread off and put them in your food processor and whirl away till they turn into crumbs.  If you don't have a food processor I don't know how you could make fresh bread crumbs...maybe a blender in small batches??
Next, I mix up all the ingredients other than the meat in my Kitchen Aid.
Here I am mixing the meat into the other ingredients by hand because I tripled the recipe and it wouldn't all fit in my Kitchen Aid.  But normally I just throw the meat into the Kitchen Aid and let it do the dirty work for me.
I use a cookie scoop to make my balls.  No rolling in the hands for me!  Cookie scoops come in very handy so you better go get yourself one.  Be sure to get one that looks like this because the other kind like to break!  Make sure there is no plastic in the scoop or spring mechanism.
Ina browns her balls in a saute pan with some oil. I have done it that way and it is super yummy, but to make my life alot easier and to make it more healthy I put them on a baking rack on a sheet pan.
I bake my meatballs in a 375 degree oven for 30 minutes or until cooked through.  I use very lean beef but even still there is some fat that drips down.  I am always happy we won't be eating that part!


Now, for the marinara.  I made up this recipe at one point.  I don't even remember what I started from.  But this recipe is easy and really good.
Gather all your ingredients.  Here I have Italian seasoning, which I used today because I was out of some of the individual herbs I usually use.
Dice your onions.  Here is a tutorial on the correct way to dice an onion.
Saute your onions in the olive oil until they are translucent, or see through.  When they are about done, add your minced garlic.  Don't let it burn or it will take on a bitter flavor!
Now, if you have kids like mine that hate chunks this next step is imperative!  Blend up your crushed tomatoes so they don't have any chunks!  I also blend up my onions AFTER they are cooked.  Just put them in the blender with some of the crushed tomatoes to help them move around.  This step, while messy and time consuming, will hopefully help ensure a more peaceful mealtime!
Put all the ingredients into the pot, cover with a lid, and let it simmer for about 30 minutes, stirring every 5 or 10 minutes.  I recommend a nonstick pot, although in this picture I was using a giant stock pot because I doubled the recipe, which makes 2 gallons!  But then at the very end once I was letting the meatballs simmer in the sauce the bottom got burned and made me MAD!

The last step is to put the cooked meatballs in the simmering sauce and let them cook together for 15-20 minutes.  This is the point that it is more likely to burn on the bottom so be sure to stir it often and keep the heat low.  Toss with cooked spaghetti or your favorite pasta!

Meatballs:
Ingredients:
` 2 pounds ground beef 
`  1 cup fresh white bread crumbs (Just process white bread or french bread in your food processor)
` 1/4 cup seasoned dry bread crumbs
`  2 tablespoons chopped fresh flat-leaf or 1 Tbsp dried 
`  1/2 cup parmesan cheese
` 1.5 tsps salt
`  1/2 teaspoon freshly ground black pepper
` 1/4 teaspoon ground nutmeg
`  1 large egg, beaten
`  1/4 cup milk

Directions:  Place all ingredients other than meat in the bowl of your electric mixer.  Mix until combined.  Add meat and mix thoroughly.  Use a cookie scoop to scoop your meatballs and place on a baking rack on a sheet pan.  Bake at 375 degrees for 30 minutes or until cooked through.  Simmer in your marinara sauce for 15 minutes. Makes about 30 meatballs.


Marinara:
Ingredients:
`1/3 cup extra-virgin olive oil
`2 small onions, diced
`3 Tbsp. minced garlic (refrigerated)
`1 (6 lb. 6 oz) can tomatoes (I use crushed)
`2 15 oz. can tomato sauce
`1 small can tomato paste.
`1 tsp. thyme
`2 tsps basil
`1/2 tsp. oregano
`1 c. parmesan cheese (optional)
`4 teaspoons kosher salt
`Freshly ground black pepper
`2 Tbsp. sugar

Directions:  Saute the onions in olive oil until almost translucent.  Add the garlic and cook until tender.  Place tomatos in blender and add onions and garlic mixture.  Blend until smooth.  Pour back into pot and add the rest of the ingredients.  Simmer for 30 minutes.  Store in individual containers in the freezer.  Makes 4 quarts


Related Posts Plugin for WordPress, Blogger...
 
Blogging tips